見る・止める・巻き戻す:Potatoのライブコーディングエージェント観察
Ollama、Anthropic API、Claude Agent SDKでライブコーディングエージェント観察を構築するチュートリアルです。一時停止、ロールバック、分岐、トラジェクトリのエクスポートまで扱います。
ライブ観察は何が違うのか
コーディングエージェントの評価はたいてい事後に行われます。エージェントを走らせ、トレースを出力し、レビュアーが後から録画を見返す形です。ライブ観察は順序が逆になります。アノテーターはエージェントの作業をリアルタイムで見守り、ファイルの編集、ターミナルコマンド、推論ステップを起きた瞬間に確認します。
これでできることが変わります。エージェントが誤った方向に進み始めたら、時間を無駄にする前にアノテーターが割り込めます。エージェントが次に進む前に一時停止してdiffをじっくり読むこともできますし、平易な言葉で指示を送って進路を変えることもできます。私が一番役に立つと思っているのはロールバックです。過去の任意のチェックポイントまで巻き戻して、エージェントに別のアプローチを試させられます。こうして生まれる分岐は、まさに選好学習が欲しがるデータです。
これは静的なトレースアノテーションの代わりではありません。別の種類のデータを生む別のモードです。予測可能なコストで量を集めたいなら静的アノテーションが向いています。狙いを絞ったデータが欲しいとき、エージェントの失敗の仕方を理解したいとき、分岐から選好ペアを作りたいときはライブ観察が向いています。
機能の完全なリファレンスはソースドキュメントを参照してください。
ライブコーディングエージェントのインターフェースはエージェントのアクションをリアルタイムでストリーミングし、作業中のコードdiffとターミナル出力を表示します。
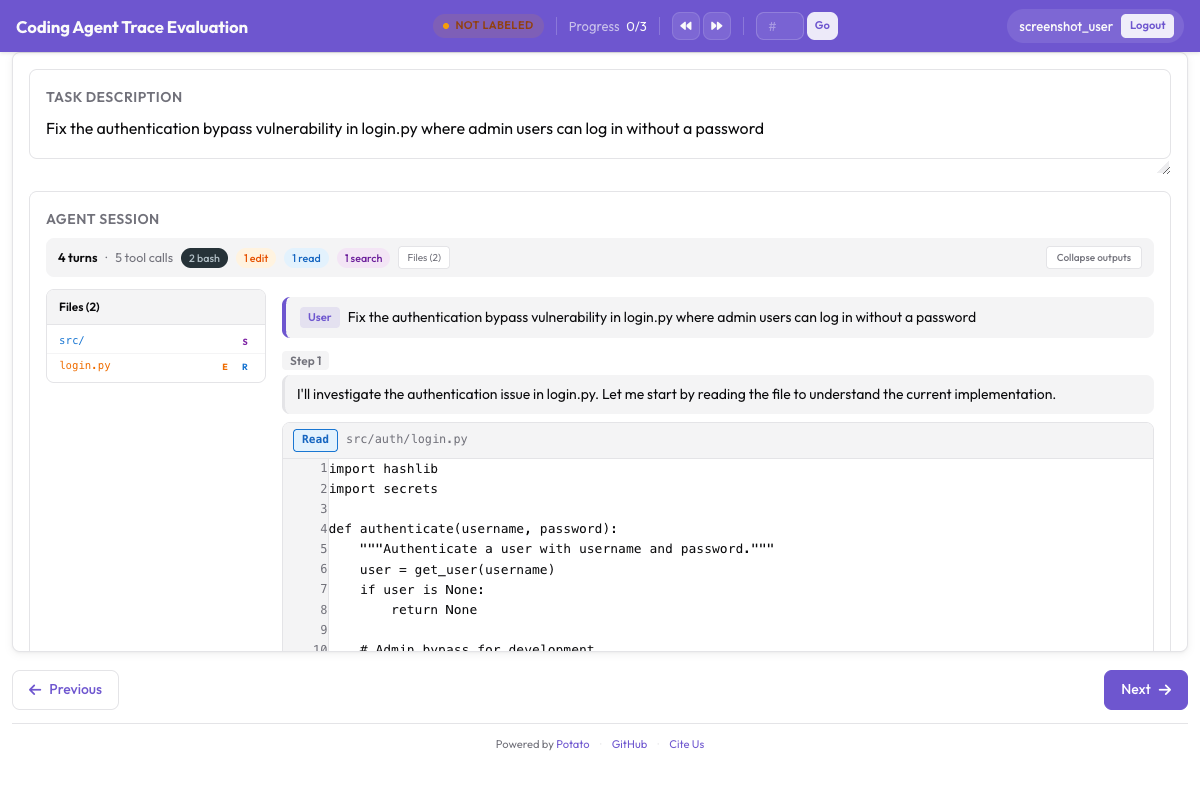 リアルタイムのdiff描画とターミナル出力を備えたライブコーディングエージェント観察
3つのバックエンド
Potatoはライブ観察のために3つのバックエンドを用意しています。いずれもコーディングエージェントをサンドボックス内で実行し、そのアクションを発生と同時にインターフェースへストリーミングします。
Ollama(完全ローカル)
Ollamaバックエンドは、APIキーもネットワーク通信もなしに、すべてを手元のマシンで実行します。コードベースが機微な場合や、API料金をかけずに試したい場合に選んでください。
まずOllamaをインストールし、ツール使用に対応したモデルを取得します。
# Install Ollama
curl -fsSL https://ollama.ai/install.sh | sh

# Pull a coding-capable model
ollama pull qwen2.5-coder:32b

# Verify the model is available
ollama list
PotatoがOllamaバックエンドを使うように設定します。
# config.yaml
project_name: "Live Agent Observation - Ollama"
port: 8000

live_coding_agent:
  enabled: true
  backend: "ollama"
  ollama:
    model: "qwen2.5-coder:32b"
    host: "http://localhost:11434"
    temperature: 0.2
    max_tokens: 4096
    num_ctx: 32768               # Context window size
  sandbox:
    type: "docker"               # "docker" or "local"
    image: "python:3.11-slim"    # Base image for sandboxed execution
    workspace: "./workspace/"    # Agent's working directory
    timeout: 600                 # Max seconds per agent session
  streaming:
    update_interval_ms: 100      # How often to push updates to the UI
    buffer_output: true          # Buffer terminal output for smoother rendering
  checkpoints:
    enabled: true
    strategy: "git"              # Git-based checkpoints
    auto_commit_on_file_change: true
    commit_message_prefix: "[potato-checkpoint]"
Anthropic API(ツール使用付きのClaude)
Anthropic APIバックエンドは、ツール使用に対応したClaudeモデルに接続します。ほとんどのローカルモデルより推論とコード生成が強く、その代わりAPI呼び出しの費用がかかります。
# Set your API key
export ANTHROPIC_API_KEY="sk-ant-..."# config.yaml
project_name: "Live Agent Observation - Claude"
port: 8000
live_coding_agent:
enabled: true
backend: "anthropic"
anthropic:
model: "claude-sonnet-4-20250514"
api_key_env: "ANTHROPIC_API_KEY"
max_tokens: 8192
temperature: 0.1
tools:
- "file_read"
- "file_edit"
- "bash_command"
- "directory_list"
- "file_search"
system_prompt: >
You are a coding agent. You will be given a task description and
access to a codebase. Use the provided tools to read files, make
edits, and run commands to complete the task. Think step by step
and verify your changes by running tests.
sandbox:
type: "docker"
image: "python:3.11-slim"
workspace: "./workspace/"
timeout: 900
allowed_commands: # Whitelist for bash commands
- "python"
- "pip"
- "pytest"
- "git"
- "ls"
- "cat"
- "find"
- "grep"
streaming:
update_interval_ms: 50
show_thinking: true # Show Claude's thinking in real time
checkpoints:
enabled: true
strategy: "git"
auto_commit_on_file_change: trueClaude Agent SDK(Claude Codeの全機能)
Claude Agent SDKバックエンドは3つの中で最も高機能で、Claude Codeのツール一式と自律的な挙動をそのまま使えます。claude-agent-sdkパッケージが必要です。
# Install the Claude Agent SDK
pip install claude-agent-sdk# config.yaml
project_name: "Live Agent Observation - Claude Agent SDK"
port: 8000
live_coding_agent:
enabled: true
backend: "claude_agent_sdk"
claude_agent_sdk:
api_key_env: "ANTHROPIC_API_KEY"
model: "claude-sonnet-4-20250514"
max_turns: 50 # Maximum number of agent turns
permission_mode: "auto" # "auto", "ask", or "restricted"
allowed_tools:
- "Read"
- "Edit"
- "Write"
- "Bash"
- "Glob"
- "Grep"
restricted_commands: # Bash commands to block
- "rm -rf /"
- "sudo"
- "curl"
- "wget"
sandbox:
type: "docker"
image: "node:20-slim"
workspace: "./workspace/"
timeout: 1200
mount_volumes:
- "./test-repo:/workspace/repo"
streaming:
update_interval_ms: 50
show_thinking: true
show_tool_inputs: true
checkpoints:
enabled: true
strategy: "git"
auto_commit_on_file_change: true
max_checkpoints: 100アノテーションの流れ
サーバーが立ち上がったら、ライブ観察のセッションはいくつかの段階を通ります。
セッションを始める
アノテーターがPotatoのインターフェースを開くと、タスク説明の入力欄が表示されます。エージェントにやらせたいタスクを貼り付けるか入力します。たとえば「新しい設定形式が原因で失敗しているtests/test_parser.pyのテストを直す」や「/api/usersエンドポイントにページネーションを追加する」などです。
# Start the server
potato start config.yaml -p 8000
アノテーターが「Start Agent」をクリックすると、コーディングエージェントが作業を始めます。各アクションはCodingTraceDisplayパネルにリアルタイムで表示されます。
エージェントの作業を見守る
エージェントが動いている間、各ステップがトレースビューアに現れます。
- 思考ステップは、エージェントの推論を示す折りたたみ可能なグレーのブロックとして表示されます。
- ファイルの読み取りは、行番号とファイルパス付きのシンタックスハイライトされたコードブロックとして表示されます。
- ファイルの編集は、赤と緑でハイライトされた統一diffとして表示されます。
- ターミナルコマンドは、コマンド、出力、終了コードを含む暗色のターミナルブロックとして表示されます。
- ファイルツリーは、ファイルが作成・変更・読み取りされるたびにサイドバーで更新されます。
上部の進捗表示には、現在のステップ番号と経過時間が出ます。エージェントの状態は「Thinking...」「Editing file...」「Running command...」のように表示されます。
一時停止と指示のコントロール
エージェントの実行中、アノテーターはコントロールバーから介入できます。
Pause:現在のステップが完了した時点でエージェントを止めます。再開するまで次のステップには進みません。エージェントが先に進む前にdiffやターミナル出力をじっくり確認したいときに使います。
Send Instruction:一時停止中(あるいは実行中でも)に、自然言語のメッセージを入力してエージェントのコンテキストに挿入します。たとえば「データベーススキーマは変更せず、マイグレーションを使ってください」や「変更する前に/var/log/app.logのエラーログを確認してください」といった具合です。
Resume:一時停止したエージェントの実行を再開します。
Stop:エージェントのセッションを完全に終了します。そこまでのトラジェクトリは保存されます。
アノテーターは、トレース表示と並べてPRMアノテーションでエージェントの作業を評価できます。
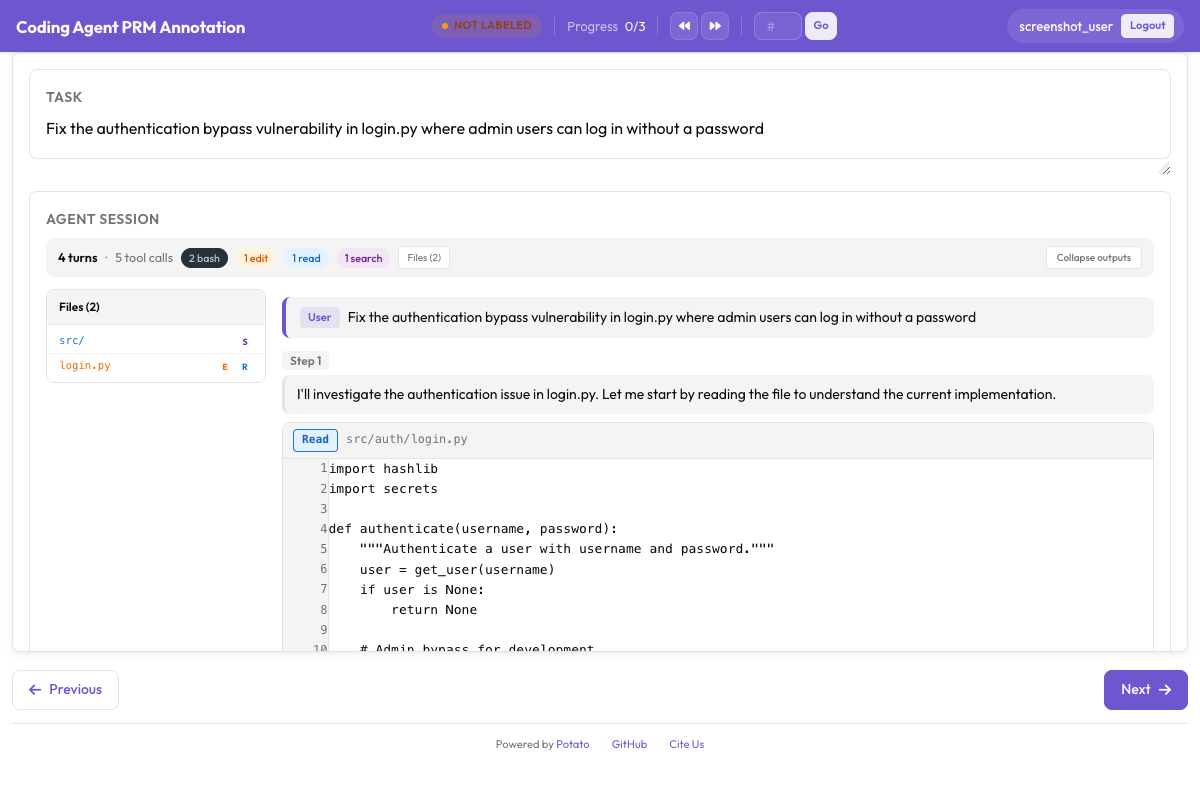 コーディングトレースと並べてステップ単位の正確性をラベル付けするPRMアノテーションインターフェース
# Control bar configuration
live_coding_agent:
  controls:
    pause_enabled: true
    instruction_enabled: true
    stop_enabled: true
    rollback_enabled: true
    branch_enabled: true
    pause_keyboard_shortcut: "Space"
    instruction_keyboard_shortcut: "i"
Gitベースのチェックポイントシステム
残りの仕組みを成り立たせているのがチェックポイントシステムです。ロールバック、分岐、トラジェクトリのエクスポートはすべてこれに依存していて、エージェントがファイルを変更するたびにgitへコミットすることで役目を果たしています。
仕組み
セッションが始まると、Potatoはサンドボックスのワークスペースにgitリポジトリを初期化します。既にある場合はそれを使います。ファイルを編集するたびに、構造化されたメッセージを付けて自動でコミットします。
[potato-checkpoint] Step 7: Edit src/parser.py
- Modified lines 45-52
- Agent reasoning: Fix the regex pattern to handle escaped quotes
結果として、トラジェクトリのステップと1対1で対応する直線的なコミット履歴ができます。各チェックポイントは、その時点のワークスペースの状態を丸ごと記録しています。
# You can inspect checkpoints directly with git
cd workspace/
git log --oneline

# Output:
# f8a2c1d [potato-checkpoint] Step 12: Edit tests/test_parser.py
# 3b7e9f0 [potato-checkpoint] Step 10: Edit src/parser.py
# a1c4d8e [potato-checkpoint] Step 8: Edit src/parser.py
# 9e2f6b3 [potato-checkpoint] Step 5: Edit src/config.py
# 7d0a3c1 [potato-checkpoint] Step 0: Initial state
ロールバック
「Rollback」をクリックし、ドロップダウンから過去のチェックポイントを選びます。Potatoはgit checkoutでワークスペースをその状態に戻し、トラジェクトリの表示も合わせて巻き戻します。エージェントはコンテキストをそのステップまで切り詰めた状態で、そこから再開します。
エージェントが誤った方向に進んだのを見たときに使う手です。そのまま走らせて時間を溶かす代わりに、最後に良かった状態まで巻き戻し、必要なら別の方向を促す指示を添えて再挑戦させます。
トラジェクトリの分岐
分岐は、両方の経路を残すロールバックです。巻き戻したあとエージェントが別の道を進むと、Potatoは名前付きのgitブランチを作り、両方のトラジェクトリを追跡します。
Step 0 → Step 1 → Step 2 → Step 3 → Step 4 (Branch A: original path)
                          ↘
                           Step 3' → Step 4' → Step 5' (Branch B: after rollback)
任意のチェックポイントから分岐でき、トラジェクトリの木を丸ごと組み上げられます。選好学習にとってこれは貴重です。分岐のペアはそれ自体が既にラベル付きの比較になっているからです。Branch Aが誤りだと判断したからこそ巻き戻したわけで、分岐点から先はBranch Bが選好された経路になります。
# Branching configuration
live_coding_agent:
  branching:
    enabled: true
    max_branches_per_session: 10
    auto_name_branches: true     # "branch-A", "branch-B", etc.
    require_reason_on_rollback: true  # Annotator must explain why they rolled back
    compare_branches_view: true  # Side-by-side view of branch outcomes
エクスポート形式
ライブセッションは詳細なトラジェクトリデータを生成します。何を訓練したいかに応じて、いくつかの形でエクスポートできます。
直線的なトラジェクトリのエクスポート
各分岐を独立したトラジェクトリとしてエクスポートします。
potato export \
  --format trajectories \
  --project ./output/ \
  --output ./training_data/trajectories.jsonl \
--flatten_branches true{
"session_id": "session_001",
"branch": "branch-A",
"task": "Fix the failing test in tests/test_parser.py",
"steps": [
{"step_idx": 0, "type": "file_read", "path": "tests/test_parser.py", "...": "..."},
{"step_idx": 1, "type": "thinking", "content": "The test expects..."},
{"step_idx": 2, "type": "file_edit", "path": "src/parser.py", "diff": "..."},
{"step_idx": 3, "type": "bash_command", "command": "pytest tests/test_parser.py"}
],
"human_interventions": [
{"after_step": 2, "type": "instruction", "content": "Use a migration instead"}
],
"rollback_from_step": null,
"outcome": "resolved"
}分岐からの選好ペア
分岐のペアを、DPOやRLHF用の選好データとしてエクスポートします。
potato export \
  --format branch_preferences \
  --project ./output/ \
--output ./training_data/branch_preferences.jsonl{
"session_id": "session_001",
"task": "Fix the failing test in tests/test_parser.py",
"branch_point_step": 2,
"branch_point_reason": "Agent started modifying the wrong file",
"rejected_branch": "branch-A",
"rejected_steps": [
{"step_idx": 3, "type": "file_edit", "path": "src/wrong_file.py", "...": "..."},
{"step_idx": 4, "type": "bash_command", "command": "pytest", "exit_code": 1}
],
"chosen_branch": "branch-B",
"chosen_steps": [
{"step_idx": 3, "type": "file_edit", "path": "src/parser.py", "...": "..."},
{"step_idx": 4, "type": "bash_command", "command": "pytest", "exit_code": 0}
]
}ライブ観察からのPRMラベル
ロールバックした地点はたいてい最初のエラーのステップなので、ライブ観察とPRMラベリングを組み合わせられます。
potato export \
  --format prm_from_branches \
  --project ./output/ \
  --output ./training_data/prm_live.jsonl
ここでは、ロールバックの起点になったステップが最初のエラーとしてラベル付けされ、新しい分岐のステップは受け入れたものなので正しいとラベル付けされます。
コードレビューのデータセット
アノテーターの指示とロールバックの理由を、コードレビューの訓練データとしてエクスポートします。
potato export \
  --format code_review \
  --project ./output/ \
  --output ./training_data/code_review.jsonl
通しのクイックスタート
何もない状態からOllamaのセッションを動かすまでの全手順です。
# 1. Install Potato with live agent support
pip install potato-annotation[live-agents]

# 2. Install and start Ollama
curl -fsSL https://ollama.ai/install.sh | sh
ollama pull qwen2.5-coder:32b

# 3. Set up a workspace with a repo to work on
mkdir -p workspace/
git clone https://github.com/example/test-project workspace/repo

# 4. Create the config file
cat > config.yaml << 'YAML'
project_name: "Live Agent Observation"
port: 8000

live_coding_agent:
  enabled: true
  backend: "ollama"
  ollama:
    model: "qwen2.5-coder:32b"
    host: "http://localhost:11434"
    temperature: 0.2
    num_ctx: 32768
  sandbox:
    type: "local"
    workspace: "./workspace/repo"
    timeout: 600
  streaming:
    update_interval_ms: 100
  checkpoints:
    enabled: true
    strategy: "git"
    auto_commit_on_file_change: true
  controls:
    pause_enabled: true
    instruction_enabled: true
    rollback_enabled: true
    branch_enabled: true
  branching:
    enabled: true
    max_branches_per_session: 5
    require_reason_on_rollback: true

annotation_schemes:
  - annotation_type: radio
    name: outcome
    label: "Final outcome"
    options:
      - value: "resolved"
        text: "Task Fully Resolved"
      - value: "partial"
        text: "Partially Resolved"
      - value: "failed"
        text: "Failed"

  - annotation_type: text_input
    name: notes
    label: "Session Notes"
    placeholder: "Key observations about agent behavior..."
    required: false

output:
  path: "./output/"
  format: "jsonl"
  export_formats:
    - "trajectories"
    - "branch_preferences"
    - "prm_from_branches"

annotators:
  - username: "observer1"
    password: "observer_pw_1"
YAML

# 5. Start Potato
potato start config.yaml -p 8000

# 6. Open http://localhost:8000 in your browserログイン後、「/api/usersのPOSTエンドポイントに入力バリデーションを追加する」のようなタスクを貼り付けて「Start Agent」をクリックします。作業を見守り、おかしいと思ったら一時停止し、指示を送って方向を修正し、ロールバックして別のアプローチを試してください。終わったら結果を評価し、メモを残します。
実践上のコツ
明確で範囲の定まったタスクから始める。 ちょうどよいのは、エージェントが5〜15分で終える程度の作業です。これより短いとアノテーションに値するだけのトラジェクトリが出ませんし、大幅に長いとアノテーターが疲弊します。
本番ではDockerサンドボックスを使う。 開発中はローカルのサンドボックスモードで構いませんが、Dockerを使えばエージェントがホストシステムに触れられなくなります。信頼できないモデルを扱うときは必ず使ってください。
ロールバックの理由を記録する。 require_reason_on_rollbackを有効にすると、分岐点ごとに何がまずかったかの人手によるメモが残ります。このメモ自体が有用な訓練シグナルになりますし、選好データの質も上がります。
複数のバックエンドを比較する。 同じタスクをOllama、Anthropic API、Claude Agent SDKで回すと、エージェント横断の選好データが得られます。設定はバックエンドの部分だけを変えればよいので、準備は簡単です。
こまめにエクスポートする。 最後にまとめてではなく、セッションごとにエクスポートを走らせてください。何かが落ちたときの損失が小さくなりますし、進めながらデータの品質を確認できます。