Quick Start
Get Potato running in under 5 minutes. Install with pip, write a YAML config, launch the server, and annotate your first dataset without writing code.
This guide takes you from a fresh install to annotating data in under 5 minutes. It shows how to write a task yourself. The other way to start is to describe the study to a coding agent and let potato-skill design and build it, which Quick Start with a Coding Agent covers.
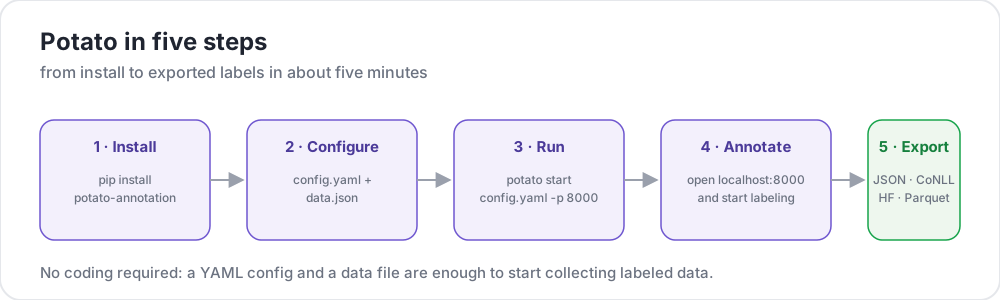 Potato in five steps
Prerequisites
- Python 3.9 or higher
pippackage manager- A terminal
Installation
We recommend installing Potato into a virtual environment so it doesn't collide with your system Python:
python -m venv potato-env
source potato-env/bin/activate   # Windows: potato-env\Scripts\activate
pip install potato-annotation
Verify the install:
python -c "import potato; print(potato.__version__)"You should see 2.11.1 printed. From version 2.9, potato --version reports the same number, and adds the commit when you are running from a checkout.
Create Your First Project
1. Create a project directory
mkdir my-annotation-task
cd my-annotation-task
2. Create your data file
Create a data folder and a file called data.json inside it:
mkdir data[
{"id": "1", "text": "I love this product! It's amazing."},
{"id": "2", "text": "This is the worst experience ever."},
{"id": "3", "text": "It's okay, nothing special."}
]Potato also accepts .jsonl (one JSON object per line), .csv, and .tsv for data_files. Point at a file with the matching extension and Potato picks the reader from it.
3. Create your configuration
Create a file called config.yaml in your project directory:
Path sandbox: Any relative paths inside your config (like
data_filesoroutput_annotation_dir) are resolved againsttask_dirand must stay inside it. Paths that resolve outsidetask_dirare rejected to prevent path traversal.
annotation_task_name: "Sentiment Analysis"

# All relative paths below are resolved against task_dir.
task_dir: "."

# Data configuration
data_files:
  - "data/data.json"

# Tell Potato which fields in each record to use.
# id_key = unique identifier; text_key = the text shown to annotators.
item_properties:
  id_key: id
  text_key: text

# Where per-user annotation state is stored (relative to task_dir).
output_annotation_dir: "annotation_output/"

# Also write a periodic flat export, because the per-user state files are
# awkward to analyze. No exporter is named "json", so use "jsonl".
export_annotation_format: "jsonl"

# Annotation scheme
annotation_schemes:
  - annotation_type: radio
    name: sentiment
    description: "What is the sentiment of this text?"   # required for radio schemes
    labels:
      - Positive
      - Negative
      - Neutral

# Skip password authentication so anyone can log in with just a username.
require_password: falseTip: You can validate your config without launching the full server using the Preview CLI. It's the fastest way to catch typos before you start annotating.
4. Start the server
potato start config.yaml -p 8000Equivalent long form:
python -m potato start config.yaml -p 8000If port 8000 is already in use, pick another with -p 8001. To stop the server, press Ctrl+C in the terminal.
Faster first run: Add
--debug --debug-phase=annotationto skip the login and consent pages while you experiment:potato start config.yaml --debug --debug-phase=annotation. Every visitor is then signed in as one shareddebug_user, so use it only on your own machine.
5. Open your browser
Navigate to http://localhost:8000. You'll see a login screen with a single username field. Type anything (e.g. alice) and click Continue, and you're annotating.
Each time you select a label and click Next, your annotation is saved automatically. There's no separate "save" button.
Where Your Annotations Go
Potato writes per-user state as you annotate:
my-annotation-task/
├── config.yaml
├── data/
│   └── data.json
└── annotation_output/              # created automatically
    └── alice/
        └── user_state.json         # one folder per username
user_state.json holds the full annotation state for that user. To produce a consolidated, flat file across all annotators, run Potato's export CLI, which the export documentation describes. Run python -m potato.export --list-formats to see every format it registers.
Common First-Run Issues
Address already in use— port 8000 is taken. Use-p 8001(or any free port).KeyError: 'description'— a radio (or similar) scheme is missing its requireddescriptionfield. Every scheme needs one.Path ... is outside the task directory— adata_filesoroutput_annotation_dirpath escapestask_dir. Keep everything inside the project folder, or settask_dirto an absolute path that contains them.- Login page shows a password field — you forgot
require_password: false, or you're on a cached browser tab. Restart the server and hard-refresh.
Frequently Asked Questions
The questions below cover installing Potato, running it in Docker, and checking a config before annotators see it.
How do I install Potato?
Install it from PyPI with pip install potato-annotation, on Python 3.9 or later. Installing into a virtual environment keeps Potato's dependencies apart from your system Python, and potato --version confirms the install by printing the version number.
Can I run Potato in Docker?
Yes. Potato publishes a prebuilt image, ghcr.io/davidjurgens/potato, to GitHub Container Registry. Your project folder mounts into the container at /app and the server listens on port 7860 inside it, so one image serves every task. Set POTATO_SECRET_KEY so that annotator sessions survive a restart. Deploying Potato on a Server gives the full docker run command.
How do I check a Potato config before annotators see it?
Run potato validate config.yaml --strict, which checks the config the way the server does at boot and turns warnings, such as an unrecognized key, into failures. potato preview config.yaml then shows what the config declares and renders the interface in a browser, so you see the task as an annotator will before anyone logs in.
What's Next?
- Learn about Configuration Basics for more options
- Have a coding agent design and build your next task with potato-skill
- Explore different Annotation Types
- Set up User Management for your team
- Discover What's New in v2 including AI support and active learning
Tools & Utilities
Once you're comfortable with the basics, check out these helpful tools:
- Preview CLI - Validate configurations without running the server
- Debugging Guide - Debug flags and troubleshooting tips
- User Simulator - Test with simulated annotators