어노테이션 스키마
radio, multiselect, span, likert, slider, text 외 55가지 유형으로 YAML에서 어노테이션 스키마를 정의합니다. 레이블, 질문, 필수 항목을 설정하는 방법을 설명합니다.
어노테이션 스키마는 어노테이터가 수행할 레이블링 작업을 정의합니다. Potato는 61가지 어노테이션 유형을 지원하며, 이를 조합해 복잡한 어노테이션 작업을 만들 수 있습니다.
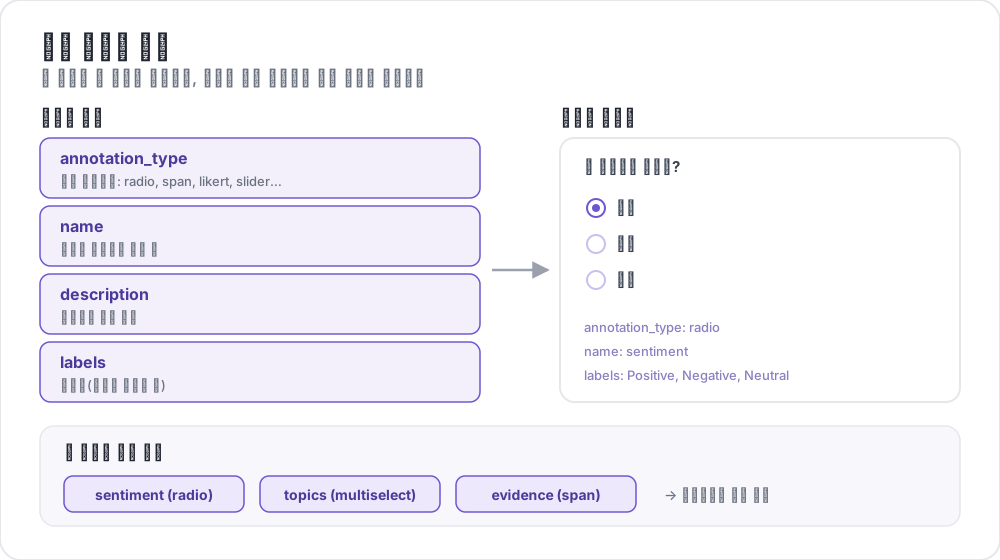 주석 스킴의 구조
기본 구조
각 스키마는 annotation_schemes 배열에 정의됩니다:
annotation_schemes:
  - annotation_type: radio
    name: sentiment
    description: "What is the sentiment?"
    labels:
      - Positive
      - Negative
      - Neutral
필수 항목
모든 스키마에는 다음 세 항목이 있습니다. 유형마다 고유한 필수 항목이 여기에 추가되며, 아래 각 유형 설명에 함께 나와 있습니다.
| 항목 | 설명 |
|---|---|
annotation_type | 어노테이션 유형 (radio, multiselect, likert, span, text, number, slider, multirate, select, pairwise, bws, soft_label, confidence, constant_sum, range_slider, semantic_differential, hierarchical_multiselect, card_sort, rubric_eval, extractive_qa, error_span, triage, coreference, span_link 등) |
name | 내부 식별자 (공백 없음, 출력에 사용됨) |
description | 어노테이터에게 표시되는 지침 |
지원되는 어노테이션 유형
1. Radio (단일 선택)
목록에서 정확히 하나의 옵션을 선택합니다:
- annotation_type: radio
  name: sentiment
  description: "What is the sentiment of this text?"
  labels:
    - Positive
    - Negative
    - Neutral

  # Assigns keys 1, 2, 3... in the order the labels are listed
  sequential_key_binding: true

  # Horizontal layout instead of vertical
  horizontal: true
순차 바인딩은 숫자 1-9를 처음 아홉 개의 레이블에 대응시키므로, 레이블 목록의 순서를 바꾸면 키도 다시 할당됩니다. 순서를 바꿔도 유지되는 바인딩이 필요하면 각 레이블에 고유한 키를 지정하세요(키보드 단축키 참조).
2. 리커트 척도
양 끝점에 레이블이 있는 평가 척도입니다:
- annotation_type: likert
  name: agreement
  description: "How much do you agree with this statement?"
  size: 5  # Number of scale points
  min_label: "Strongly Disagree"
  max_label: "Strongly Agree"

  # Show the numeric value of the selected point
displaying_score: truesize와 양 끝점 레이블은 모두 필수입니다. 5점 척도는 어노테이터에게 중립적인 중간점을 제공하고, 짝수 크기는 어느 한쪽 방향을 고르게 합니다.
3. Multiselect (다중 선택)
목록에서 여러 옵션을 선택합니다:
- annotation_type: multiselect
  name: topics
  description: "Select all relevant topics"
  labels:
    - Politics
    - Technology
    - Sports
    - Entertainment
    - Science

  # Require at least one box before the annotator can move on
  label_requirement:
    required: true

  # Allow free text response
has_free_response: truehas_free_response는 "other" 텍스트 상자를 추가합니다. 레이블 세트를 아직 수정하는 중이라면 켜 둘 만합니다. 여기에 모이는 입력이 빠진 범주를 알려 주기 때문입니다.
4. Span 어노테이션
텍스트 구간을 강조 표시하고 레이블을 지정합니다:
- annotation_type: span
  name: entities
  description: "Highlight named entities in the text"
  labels:
    - PERSON
    - ORGANIZATION
    - LOCATION
    - DATE

  # Show the label name on each highlighted span
  show_span_labels: true

  # Ctrl/Cmd+click to add non-contiguous ranges to one annotation
  allow_discontinuous: false

  # Keyboard shortcuts for labels
sequential_key_binding: trueallow_discontinuous는 분리된 선행사처럼 떨어진 여러 범위로 이루어진 스팬을 위한 것이며, 서로 겹치는 스팬을 위한 것이 아닙니다. 레이블을 지정하는 현상이 실제로 중간에 끊어지는 경우가 아니라면 꺼 두세요. Ctrl/Cmd 클릭 동작은 실수로 하기 쉽기 때문입니다.
5. Slider
연속적인 숫자 범위입니다:
- annotation_type: slider
  name: confidence
  description: "How confident are you in your answer? (0 = not at all, 100 = completely)"
  min_value: 0
  max_value: 100
  starting_value: 50
  step: 1

  # Shows min_value and max_value at the ends of the track
show_labels: truemin_value, max_value, starting_value 세 가지 모두 필수입니다. slider는 labels 목록을 받지 않습니다. 목록을 추가하면 질문이 radio 레이아웃으로 바뀌고 slider는 사라지므로, 척도 양 끝에 대한 문구는 description에 넣으세요. 시작 값은 어노테이터가 건드리기 전에 핸들이 놓이는 위치이므로, 중간점으로 두면 어느 한쪽 끝으로 기준점이 쏠리는 것(앵커링)을 피할 수 있습니다.
6. 텍스트 입력
자유 형식의 텍스트 응답입니다:
- annotation_type: text
  name: explanation
  description: "Explain your reasoning"

  # Multi-line input
  rows: 4

  # Require a minimum length and show a running count
  min_chars: 20
  show_char_count: true

  # Placeholder text
  placeholder: "Enter your explanation here..."

  # Disable paste (for transcription tasks)
  allow_paste: false
allow_paste: false는 전사 작업과 자유 회상 작업에서 중요합니다. 이런 작업에서 붙여 넣은 답은 어노테이터가 직접 만든 것이 아니라 원본에서 복사한 것이기 때문입니다.
7. 숫자 입력
제약 조건이 있는 숫자 입력입니다:
- annotation_type: number
  name: count
  description: "How many entities are mentioned?"
  min: 0
  max: 100
  step: 1
8. Multirate (행렬 평가)
여러 항목을 동일한 척도로 평가합니다:
- annotation_type: multirate
  name: quality_aspects
  description: "Rate each aspect of the response"

  # Rows: the items being rated
  options:
    - Accuracy
    - Fluency
    - Relevance

  # Columns: the shared rating scale
  labels:
    - Poor
    - Fair
    - Good
    - Very Good
    - Excellent

  # Randomize row order per annotator
  option_randomization: true

  # Layout options
  arrangement: "vertical"
  display_config:
    num_columns: 2
행렬에는 행과 열이 모두 필요하므로 options와 labels는 둘 다 필수입니다. 행 순서를 무작위로 하면 순서 효과가 목록 맨 앞에 놓인 측면에 몰리지 않고 항목 전체에 분산됩니다.
공통 옵션
키보드 단축키
키보드 바인딩으로 어노테이션 속도를 높입니다:
# Automatic sequential binding: digits 1, 2, 3... in label order
sequential_key_binding: true
레이블 목록이 바뀌어도 움직이지 않는 바인딩을 원하면, 레이블을 객체로 전달하고 각각에 key_value를 지정하세요:
labels:
  - name: Positive
    key_value: "1"
  - name: Negative
    key_value: "2"
  - name: Neutral
    key_value: "3"
툴팁
개별 레이블에 마우스를 올렸을 때 표시되는 힌트를 제공합니다. 툴팁은 스키마가 아니라 레이블에 붙으므로 labels 안에서 설정합니다:
labels:
  - name: Positive
    tooltip: "Expresses happiness, approval, or satisfaction"
  - name: Negative
    tooltip: "Expresses sadness, anger, or disappointment"
  - name: Neutral
    tooltip: "No clear emotional content"
서식이 있는 안내를 보여 주려면 대신 tooltip_file로 HTML 파일을 지정하세요:
labels:
  - name: Economic
    tooltip_file: "config/tooltips/economic.html"
레이블 색상
시각적 구분을 위한 사용자 지정 색상으로, 프로젝트 전체에 대해 ui 아래에서 한 번 정의합니다:
ui:
  label_colors:
    entities:
      PERSON: "#3b82f6"
      LOCATION: "#10b981"
      ORGANIZATION: "#f59e0b"
색상은 먼저 스키마 이름, 그다음 레이블을 키로 지정합니다. 개별 레이블에 툴팁과 함께 색상을 설정할 수도 있습니다:
labels:
  - name: positive
    color: "#22C55E"
    tooltip: "Positive sentiment"
필수 항목
제출 전에 스키마를 필수로 만듭니다:
- annotation_type: radio
  name: sentiment
  description: "What is the sentiment?"
  label_requirement:
    required: true
  labels:
    - Positive
    - Negative
아무 응답이 아니라 특정 옵션을 필수로 하려면 required_label로 그 옵션을 지정하세요. 레이블 하나 또는 목록을 받습니다.
여러 스키마
인스턴스마다 여러 어노테이션 유형을 조합합니다:
annotation_schemes:
  # Primary classification
  - annotation_type: radio
    name: sentiment
    description: "Overall sentiment"
    labels:
      - Positive
      - Negative
      - Neutral
    label_requirement:
      required: true
    sequential_key_binding: true

  # Confidence rating
  - annotation_type: likert
    name: confidence
    description: "How confident are you?"
    size: 5
    min_label: "Guessing"
    max_label: "Certain"

  # Topic tags
  - annotation_type: multiselect
    name: topics
    description: "Select all relevant topics"
    labels:
      - Politics
      - Technology
      - Sports
      - Entertainment
    has_free_response: true

  # Notes
  - annotation_type: text
    name: notes
    description: "Any additional observations"
    rows: 4
    label_requirement:
      required: false
여기서는 sentiment 레이블만 필수입니다. 확신도 평가와 메모를 선택 사항으로 두면 필수 항목이 연구가 의존하는 하나의 항목으로 한정되므로, 분석상 의미가 없는 입력란 때문에 어노테이터가 막히지 않습니다.
고급 기능
쌍대 비교
두 항목을 비교합니다. 항목은 인스턴스 자체에서 가져오며, items_key가 해당 필드를 지정합니다:
- annotation_type: pairwise
  name: preference
  description: "Which response is better?"
  mode: binary
  items_key: "responses"   # Field holding a list of 2+ items

  # Labels for the two sides
  show_labels: true
  labels:
    - "Response A"
    - "Response B"

  # Tie option (opt-in)
  allow_tie: true
  tie_label: "No preference"
쌍은 데이터 파일이 제공하므로, 각 줄에는 두 개 이상의 항목으로 된 목록이 들어 있습니다:
{"id": "1", "responses": ["First response text", "Second response text"]}실제로 동등한 쌍이 자주 나온다면 동점 버튼을 추가할 만합니다. 버튼이 없으면 어노테이터가 동점을 임의로 가르게 되고, 그 잡음이 불일치로 나타나기 때문입니다.
Best-Worst 척도화
튜플에서 가장 좋은 항목과 가장 나쁜 항목을 골라 순위를 매깁니다. 튜플은 스키마가 아니라 최상위 bws_config 블록이 만들며, 이 블록이 없는 bws 스키마는 빈 항목 목록에 대한 질문을 표시합니다:
bws_config:
  tuple_size: 4              # Items per tuple
  min_item_appearances: 8    # Minimum appearances per item across tuples
  seed: 42
  scoring:
    method: counting         # counting | bradley_terry | plackett_luce

annotation_schemes:
  - annotation_type: bws
    name: ranking
    description: "Sentiment Intensity"
    best_description: "Which sentence expresses the MOST positive sentiment?"
    worst_description: "Which sentence expresses the LEAST positive sentiment?"
    tuple_size: 4
    sequential_key_binding: true
데이터 파일의 각 행이 하나의 항목이며, Potato는 이 풀에서 튜플을 샘플링합니다. min_item_appearances를 높이면 각 항목의 점수가 더 정밀해지지만, 그만큼 비교 횟수가 늘어납니다.
드롭다운 선택
공간을 절약하는 단일 선택입니다:
- annotation_type: select
  name: category
  description: "Select a category"
  labels:
    - Category A
    - Category B
    - Category C
    - Category D
    - Category E

  # Vary the option order between annotators
  randomize_order: true
드롭다운은 열기 전까지 옵션을 숨기므로, radio 버튼으로는 텍스트가 화면 밖으로 밀려날 만큼 긴 레이블 세트에 적합합니다. 짧은 세트에서는 두 번이 아니라 한 번의 클릭으로 끝나는 radio 버튼이 더 빠릅니다.
데이터 형식 참조
입력
어노테이션 스키마는 사용 중인 데이터 형식과 함께 작동합니다:
{
  "id": "doc_1",
  "text": "This is the text to annotate."
}
출력
어노테이션은 스키마 이름을 키로 하여 저장됩니다:
{
  "id": "doc_1",
  "annotations": {
    "sentiment": "Positive",
    "confidence": 4,
    "topics": ["Technology", "Science"],
    "entities": [
      {"start": 0, "end": 4, "label": "ORGANIZATION", "text": "This"}
    ],
    "notes": "Clear positive sentiment about technology."
  }
}
모범 사례
1. 명확한 레이블
모호하지 않고 서로 구분되는 레이블을 사용합니다:
다음 레이블은 하나의 차원 위에서 서로 다른 지점을 가리킵니다:
labels:
  - Strongly Positive
  - Somewhat Positive
  - Neutral
  - Somewhat Negative
  - Strongly Negative
다음 레이블은 그렇지 않습니다. 두 어노테이터가 "OK", "Fine", "Acceptable" 사이에 같은 경계를 긋지 않을 것이고, 그에 따른 불일치는 데이터가 아니라 레이블 세트에서 비롯됩니다:
labels:
  - Good
  - OK
  - Fine
  - Acceptable
2. 도움이 되는 툴팁
미묘한 차이가 있는 레이블에는 툴팁을 추가합니다:
labels:
  - name: Sarcasm
    tooltip: "The text says the opposite of what it means"
  - name: Irony
    tooltip: "A mismatch between expectation and reality"
3. 키보드 단축키
대량 작업에는 단축키를 활성화합니다:
sequential_key_binding: true4. 논리적인 순서
레이블을 일관되게 정렬합니다:
- 가장 흔한 것을 먼저
- 알파벳 순서로
- 강도순으로 (낮음에서 높음으로)
5. 옵션 제한
선택지가 너무 많으면 어노테이션이 느려집니다:
- Radio: 2-7개 옵션
- Multiselect: 5-15개 옵션
- Likert: 5-7개 지점
6. 먼저 테스트하기
배포하기 전에 직접 여러 예시를 어노테이션하여 다음을 발견합니다:
- 모호한 레이블
- 누락된 카테고리
- 불명확한 지침