관찰, 일시정지, 되감기: Potato의 실시간 코딩 에이전트 관찰
Ollama, Anthropic API 또는 Claude Agent SDK로 실시간 코딩 에이전트 관찰을 설정하는 튜토리얼입니다. 일시정지, 롤백, 분기, 궤적 내보내기를 포함합니다.
실시간 관찰이 다른 점
대부분의 코딩 에이전트 평가는 사후에 이루어집니다. 에이전트가 실행되어 트레이스를 생성하면, 검토자가 나중에 그 기록을 살펴봅니다. 실시간 관찰은 그 반대로 작동합니다. 주석자는 에이전트가 작업하는 것을 실시간으로 지켜보며 각 파일 편집, 터미널 명령, 추론 단계가 일어나는 즉시 확인합니다.
이는 할 수 있는 일을 바꿉니다. 에이전트가 잘못된 길로 가기 시작하면, 주석자는 에이전트가 거기서 시간을 낭비하기 전에 개입할 수 있습니다. 에이전트가 다음으로 넘어가기 전에 일시정지하여 diff를 꼼꼼히 읽을 수도 있고, 쉬운 말로 된 지시를 보내 방향을 바꿀 수도 있습니다. 제가 가장 유용하다고 보는 부분은 롤백입니다. 이전의 어떤 체크포인트로든 되감아 에이전트가 다른 접근을 시도하도록 할 수 있습니다. 그러한 분기는 선호 학습이 원하는 바로 그런 종류의 데이터입니다.
이것은 정적 트레이스 주석을 대체하지 않습니다. 이는 다른 종류의 데이터를 생성하는 다른 방식입니다. 정적 주석은 예측 가능한 비용으로 많은 양을 원할 때 유리합니다. 실시간 관찰은 표적화된 데이터를 추구하거나, 에이전트가 어떻게 실패하는지 이해하려 하거나, 분기형 선호 쌍을 구축할 때 유리합니다.
전체 기능 레퍼런스는 소스 문서를 참고하십시오.
실시간 코딩 에이전트 인터페이스는 에이전트의 동작을 실시간으로 스트리밍하며, 에이전트가 작업하는 동안 코드 diff와 터미널 출력을 보여줍니다:
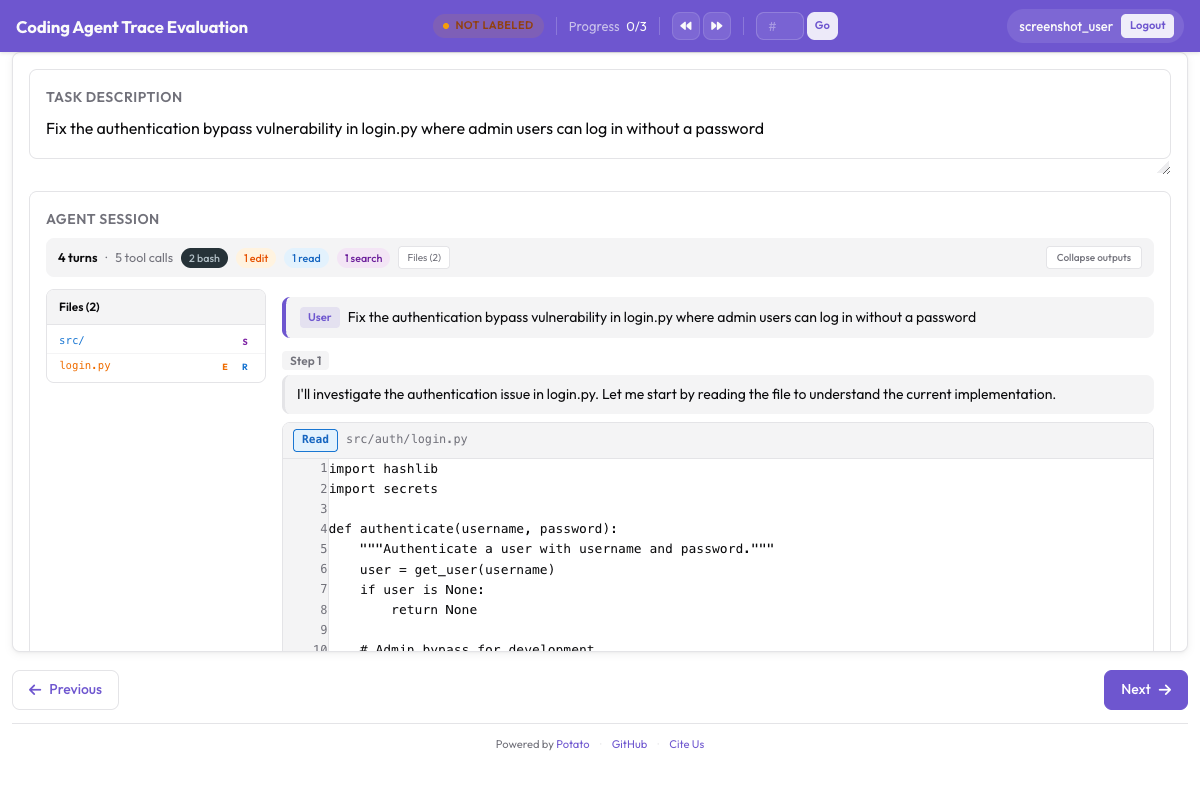 실시간 diff 렌더링과 터미널 출력을 갖춘 실시간 코딩 에이전트 관찰
세 가지 백엔드
Potato는 실시간 관찰을 위한 세 가지 백엔드를 제공합니다. 각각은 코딩 에이전트를 샌드박스에서 실행하고 그 동작을 일어나는 대로 인터페이스로 스트리밍합니다.
Ollama (완전 로컬)
Ollama 백엔드는 API 키도 네트워크 호출도 없이 전적으로 사용자의 머신에서 실행됩니다. 코드베이스가 민감하거나, API 비용을 늘리지 않고 그냥 실험해 보고 싶을 때 이것을 선택하십시오.
먼저 Ollama를 설치하고 도구 사용 기능을 갖춘 모델을 받습니다:
# Install Ollama
curl -fsSL https://ollama.ai/install.sh | sh

# Pull a coding-capable model
ollama pull qwen2.5-coder:32b

# Verify the model is available
ollama list
Ollama 백엔드를 사용하도록 Potato를 구성합니다:
# config.yaml
project_name: "Live Agent Observation - Ollama"
port: 8000

live_coding_agent:
  enabled: true
  backend: "ollama"
  ollama:
    model: "qwen2.5-coder:32b"
    host: "http://localhost:11434"
    temperature: 0.2
    max_tokens: 4096
    num_ctx: 32768               # Context window size
  sandbox:
    type: "docker"               # "docker" or "local"
    image: "python:3.11-slim"    # Base image for sandboxed execution
    workspace: "./workspace/"    # Agent's working directory
    timeout: 600                 # Max seconds per agent session
  streaming:
    update_interval_ms: 100      # How often to push updates to the UI
    buffer_output: true          # Buffer terminal output for smoother rendering
  checkpoints:
    enabled: true
    strategy: "git"              # Git-based checkpoints
    auto_commit_on_file_change: true
    commit_message_prefix: "[potato-checkpoint]"
Anthropic API (도구 사용이 가능한 Claude)
Anthropic API 백엔드는 도구 사용이 가능한 Claude 모델에 연결됩니다. 대부분의 로컬 모델보다 더 강력한 추론과 코드 생성을 얻고, 그 대가로 API 호출에 비용을 지불합니다.
# Set your API key
export ANTHROPIC_API_KEY="sk-ant-..."# config.yaml
project_name: "Live Agent Observation - Claude"
port: 8000
live_coding_agent:
enabled: true
backend: "anthropic"
anthropic:
model: "claude-sonnet-4-20250514"
api_key_env: "ANTHROPIC_API_KEY"
max_tokens: 8192
temperature: 0.1
tools:
- "file_read"
- "file_edit"
- "bash_command"
- "directory_list"
- "file_search"
system_prompt: >
You are a coding agent. You will be given a task description and
access to a codebase. Use the provided tools to read files, make
edits, and run commands to complete the task. Think step by step
and verify your changes by running tests.
sandbox:
type: "docker"
image: "python:3.11-slim"
workspace: "./workspace/"
timeout: 900
allowed_commands: # Whitelist for bash commands
- "python"
- "pip"
- "pytest"
- "git"
- "ls"
- "cat"
- "find"
- "grep"
streaming:
update_interval_ms: 50
show_thinking: true # Show Claude's thinking in real time
checkpoints:
enabled: true
strategy: "git"
auto_commit_on_file_change: trueClaude Agent SDK (전체 Claude Code 기능)
Claude Agent SDK 백엔드는 세 가지 중 가장 강력하며, Claude Code 도구 전체 세트와 자율적 동작을 갖추고 있습니다. 이는 claude-agent-sdk 패키지가 필요합니다.
# Install the Claude Agent SDK
pip install claude-agent-sdk# config.yaml
project_name: "Live Agent Observation - Claude Agent SDK"
port: 8000
live_coding_agent:
enabled: true
backend: "claude_agent_sdk"
claude_agent_sdk:
api_key_env: "ANTHROPIC_API_KEY"
model: "claude-sonnet-4-20250514"
max_turns: 50 # Maximum number of agent turns
permission_mode: "auto" # "auto", "ask", or "restricted"
allowed_tools:
- "Read"
- "Edit"
- "Write"
- "Bash"
- "Glob"
- "Grep"
restricted_commands: # Bash commands to block
- "rm -rf /"
- "sudo"
- "curl"
- "wget"
sandbox:
type: "docker"
image: "node:20-slim"
workspace: "./workspace/"
timeout: 1200
mount_volumes:
- "./test-repo:/workspace/repo"
streaming:
update_interval_ms: 50
show_thinking: true
show_tool_inputs: true
checkpoints:
enabled: true
strategy: "git"
auto_commit_on_file_change: true
max_checkpoints: 100주석 작업 흐름
서버가 가동되면, 실시간 관찰 세션은 몇 가지 단계를 거칩니다.
세션 시작하기
주석자는 Potato 인터페이스를 열고 작업 설명 입력 필드를 봅니다. 에이전트가 완료해야 할 작업을 붙여넣거나 입력합니다. 예를 들어 "새 구성 형식으로 인해 실패하는 tests/test_parser.py의 테스트를 수정하라" 또는 "/api/users 엔드포인트에 페이지네이션 지원을 추가하라" 같은 것입니다.
# Start the server
potato start config.yaml -p 8000
주석자가 "Start Agent"를 클릭하면 코딩 에이전트가 작업을 시작합니다. 각 동작은 CodingTraceDisplay 패널에 실시간으로 나타납니다.
에이전트의 작업 지켜보기
에이전트가 실행되는 동안, 각 단계가 트레이스 뷰어에 나타납니다:
- 추론 단계는 에이전트의 추론을 보여주는 접을 수 있는 회색 블록으로 나타납니다.
- 파일 읽기는 줄 번호와 파일 경로가 있는 구문 강조 코드 블록으로 나타납니다.
- 파일 편집은 빨강/초록 강조가 있는 통합 diff로 나타납니다.
- 터미널 명령은 명령, 출력, 종료 코드가 있는 어두운 터미널 블록으로 나타납니다.
- 파일 트리는 파일이 생성, 수정 또는 읽힐 때 사이드바에서 갱신됩니다.
상단의 진행 표시기는 현재 단계 번호와 경과 시간을 보여줍니다. 에이전트의 상태는 "Thinking...", "Editing file...", "Running command..." 등으로 표시됩니다.
일시정지 및 지시 제어
에이전트가 실행되는 동안, 주석자는 제어 바를 통해 개입할 수 있습니다:
Pause: 현재 단계가 완료된 후 에이전트를 멈춥니다. 재개되기 전까지 에이전트는 다음 단계로 진행하지 않습니다. 에이전트가 넘어가기 전에 diff나 터미널 출력을 꼼꼼히 살펴보려면 이것을 사용하십시오.
Send Instruction: 일시정지된 동안(또는 실행 중에도), 에이전트의 컨텍스트에 주입되는 자연어 메시지를 입력합니다. 예를 들면 "Don't modify the database schema, use a migration instead" 또는 "Check the error log at /var/log/app.log before making changes."
Resume: 일시정지 후 에이전트 실행을 계속합니다.
Stop: 에이전트 세션을 완전히 종료합니다. 이 시점까지의 궤적이 저장됩니다.
주석자는 트레이스 표시와 함께 PRM 주석을 사용하여 에이전트의 작업을 평가할 수 있습니다:
 코딩 트레이스와 함께 단계 수준 정확성 라벨링을 위한 PRM 주석 인터페이스
# Control bar configuration
live_coding_agent:
  controls:
    pause_enabled: true
    instruction_enabled: true
    stop_enabled: true
    rollback_enabled: true
    branch_enabled: true
    pause_keyboard_shortcut: "Space"
    instruction_keyboard_shortcut: "i"
git 기반 체크포인트 시스템
체크포인트 시스템은 나머지를 작동하게 만드는 요소입니다. 롤백, 분기, 궤적 내보내기가 모두 이것에 의존하며, 에이전트가 만드는 모든 파일 변경 후 git에 커밋함으로써 그 역할을 수행합니다.
작동 방식
세션이 시작되면, Potato는 샌드박스 워크스페이스에 git 저장소를 초기화하거나, 이미 있는 것을 사용합니다. 각 파일 편집 후, 구조화된 메시지로 자동으로 커밋합니다:
[potato-checkpoint] Step 7: Edit src/parser.py
- Modified lines 45-52
- Agent reasoning: Fix the regex pattern to handle escaped quotes
그 결과는 궤적의 단계와 일대일로 정렬되는 선형 커밋 이력입니다. 각 체크포인트는 그 순간 워크스페이스의 전체 상태를 캡처합니다.
# You can inspect checkpoints directly with git
cd workspace/
git log --oneline

# Output:
# f8a2c1d [potato-checkpoint] Step 12: Edit tests/test_parser.py
# 3b7e9f0 [potato-checkpoint] Step 10: Edit src/parser.py
# a1c4d8e [potato-checkpoint] Step 8: Edit src/parser.py
# 9e2f6b3 [potato-checkpoint] Step 5: Edit src/config.py
# 7d0a3c1 [potato-checkpoint] Step 0: Initial state
롤백
"Rollback"을 클릭하고 드롭다운에서 이전 체크포인트를 선택합니다. Potato는 git checkout으로 워크스페이스를 그 상태로 재설정하고 궤적 표시를 맞춰 되감으며, 그러면 에이전트는 컨텍스트가 그 단계까지 잘려 거기서부터 재개합니다.
이것은 에이전트가 잘못된 방향으로 가는 것을 볼 때의 수입니다. 에이전트가 계속 실행되며 시간을 태우게 두는 대신, 마지막으로 좋았던 상태로 되감아 다시 시도하게 하며, 어쩌면 더 나은 곳으로 밀어주는 지시와 함께 합니다.
분기 궤적
분기는 두 경로를 모두 유지하는 롤백입니다. 되감기를 하고 에이전트가 다른 길로 가면, Potato는 이름 붙은 git 브랜치를 생성하고 두 궤적을 모두 추적합니다:
Step 0 → Step 1 → Step 2 → Step 3 → Step 4 (Branch A: original path)
                          ↘
                           Step 3' → Step 4' → Step 5' (Branch B: after rollback)
어떤 체크포인트에서든 분기하여 궤적의 전체 트리를 구축할 수 있습니다. 선호 학습에 이것은 금과 같습니다. 모든 브랜치 쌍이 이미 라벨링된 비교이기 때문입니다. Branch A가 잘못되었다고 판단했기에 정확히 그래서 되감았으며, 이는 분기 지점 이후로 Branch B를 선호 경로로 만듭니다.
# Branching configuration
live_coding_agent:
  branching:
    enabled: true
    max_branches_per_session: 10
    auto_name_branches: true     # "branch-A", "branch-B", etc.
    require_reason_on_rollback: true  # Annotator must explain why they rolled back
    compare_branches_view: true  # Side-by-side view of branch outcomes
내보내기 형식
실시간 세션은 상세한 궤적 데이터를 생성하며, 무엇을 위해 훈련하는지에 따라 몇 가지 형태로 내보낼 수 있습니다.
선형 궤적 내보내기
각 브랜치를 독립적인 궤적으로 내보냅니다:
potato export \
  --format trajectories \
  --project ./output/ \
  --output ./training_data/trajectories.jsonl \
--flatten_branches true{
"session_id": "session_001",
"branch": "branch-A",
"task": "Fix the failing test in tests/test_parser.py",
"steps": [
{"step_idx": 0, "type": "file_read", "path": "tests/test_parser.py", "...": "..."},
{"step_idx": 1, "type": "thinking", "content": "The test expects..."},
{"step_idx": 2, "type": "file_edit", "path": "src/parser.py", "diff": "..."},
{"step_idx": 3, "type": "bash_command", "command": "pytest tests/test_parser.py"}
],
"human_interventions": [
{"after_step": 2, "type": "instruction", "content": "Use a migration instead"}
],
"rollback_from_step": null,
"outcome": "resolved"
}브랜치에서 나온 선호 쌍
브랜치 쌍을 DPO 또는 RLHF용 선호 데이터로 내보냅니다:
potato export \
  --format branch_preferences \
  --project ./output/ \
--output ./training_data/branch_preferences.jsonl{
"session_id": "session_001",
"task": "Fix the failing test in tests/test_parser.py",
"branch_point_step": 2,
"branch_point_reason": "Agent started modifying the wrong file",
"rejected_branch": "branch-A",
"rejected_steps": [
{"step_idx": 3, "type": "file_edit", "path": "src/wrong_file.py", "...": "..."},
{"step_idx": 4, "type": "bash_command", "command": "pytest", "exit_code": 1}
],
"chosen_branch": "branch-B",
"chosen_steps": [
{"step_idx": 3, "type": "file_edit", "path": "src/parser.py", "...": "..."},
{"step_idx": 4, "type": "bash_command", "command": "pytest", "exit_code": 0}
]
}실시간 관찰에서 나온 PRM 라벨
롤백 지점이 보통 첫 오류 단계이므로, 실시간 관찰을 PRM 라벨링과 짝지을 수 있습니다:
potato export \
  --format prm_from_branches \
  --project ./output/ \
  --output ./training_data/prm_live.jsonl
여기서 되감은 단계는 첫 오류로 라벨링되고, 새 브랜치의 단계들은 사용자가 수락했으므로 정확한 것으로 라벨링됩니다.
코드 리뷰 데이터셋
주석자 지시와 롤백 사유를 코드 리뷰 훈련 데이터로 내보냅니다:
potato export \
  --format code_review \
  --project ./output/ \
  --output ./training_data/code_review.jsonl
전체 빠른 시작
아무것도 없는 상태에서 실행 중인 Ollama 세션까지, 전체 순서입니다:
# 1. Install Potato with live agent support
pip install potato-annotation[live-agents]

# 2. Install and start Ollama
curl -fsSL https://ollama.ai/install.sh | sh
ollama pull qwen2.5-coder:32b

# 3. Set up a workspace with a repo to work on
mkdir -p workspace/
git clone https://github.com/example/test-project workspace/repo

# 4. Create the config file
cat > config.yaml << 'YAML'
project_name: "Live Agent Observation"
port: 8000

live_coding_agent:
  enabled: true
  backend: "ollama"
  ollama:
    model: "qwen2.5-coder:32b"
    host: "http://localhost:11434"
    temperature: 0.2
    num_ctx: 32768
  sandbox:
    type: "local"
    workspace: "./workspace/repo"
    timeout: 600
  streaming:
    update_interval_ms: 100
  checkpoints:
    enabled: true
    strategy: "git"
    auto_commit_on_file_change: true
  controls:
    pause_enabled: true
    instruction_enabled: true
    rollback_enabled: true
    branch_enabled: true
  branching:
    enabled: true
    max_branches_per_session: 5
    require_reason_on_rollback: true

annotation_schemes:
  - annotation_type: radio
    name: outcome
    label: "Final outcome"
    options:
      - value: "resolved"
        text: "Task Fully Resolved"
      - value: "partial"
        text: "Partially Resolved"
      - value: "failed"
        text: "Failed"

  - annotation_type: text_input
    name: notes
    label: "Session Notes"
    placeholder: "Key observations about agent behavior..."
    required: false

output:
  path: "./output/"
  format: "jsonl"
  export_formats:
    - "trajectories"
    - "branch_preferences"
    - "prm_from_branches"

annotators:
  - username: "observer1"
    password: "observer_pw_1"
YAML

# 5. Start Potato
potato start config.yaml -p 8000

# 6. Open http://localhost:8000 in your browser
로그인한 후, "Add input validation to the /api/users POST endpoint" 같은 작업을 붙여넣고 "Start Agent"를 클릭합니다. 작업하는 것을 지켜보고, 무언가 잘못되어 보이면 일시정지하고, 지시를 보내 방향을 잡고, 다른 접근을 시도하기 위해 되감습니다. 끝나면 결과를 평가하고 메모를 적어둡니다.
모범 사례
명확하고 범위가 정해진 작업으로 시작하십시오. 가장 적절한 지점은 에이전트가 5분에서 15분 정도 걸리는 작업입니다. 그보다 짧으면 주석할 만한 충분한 궤적이 나오지 않고, 그보다 훨씬 길면 주석자를 지치게 합니다.
프로덕션에서는 Docker 샌드박싱을 사용하십시오. 로컬 샌드박스 모드는 개발 중에는 괜찮지만, Docker는 에이전트가 호스트 시스템을 건드리지 못하게 합니다. 신뢰할 수 없는 모델에는 항상 이것을 사용하십시오.
롤백 사유를 기록하십시오. require_reason_on_rollback를 켜서 모든 분기 지점에 무엇이 잘못되었는지에 대한 사람의 메모가 따라오도록 하십시오. 그러한 메모는 그 자체로 유용한 훈련 신호이며, 선호 데이터를 더 좋게 만듭니다.
여러 백엔드를 비교하십시오. 동일한 작업을 Ollama, Anthropic API, Claude Agent SDK를 통해 실행하여 에이전트 간 선호 데이터를 얻으십시오. 구성에서 백엔드 섹션만 바뀌므로 설정하기 쉽습니다.
자주, 일찍 내보내십시오. 모든 것을 끝까지 모아두는 대신 각 세션 후에 내보내기를 실행하십시오. 무언가 충돌해도 손실이 적고, 진행하면서 데이터 품질을 주시할 수 있습니다.