AI 에이전트 평가: 에이전트 트레이스의 인간 어노테이션 완벽 가이드
Potato의 에이전틱 어노테이션 기능을 사용해 AI 에이전트 출력의 인간 평가를 설정하는 방법을 트레이스 가져오기부터 어노테이션 스키마 설계까지 배워보세요.
자동화된 지표는 에이전트가 얼마나 자주 성공하는지를 알려줍니다. 하지만 왜 실패했는지는 알려주지 않는데, 정작 알아야 하는 것은 보통 그쪽입니다. 인간 평가는 그것을 알려줍니다. 최종 점수만이 아니라 추론이 어긋난 단계를 보여줍니다. 이 가이드에서는 Potato의 에이전틱 어노테이션 기능을 사용해 AI 에이전트를 위한 완전한 인간 평가 파이프라인을 구축합니다.
 From raw traces to structured judgments
웹을 검색해 질문에 답하는 ReAct 스타일 에이전트를 평가하겠습니다. 끝마칠 무렵에는 다음을 갖추게 됩니다.
- Potato로 가져온 에이전트 트레이스
- 에이전트 트레이스 표시 설정
- 전체 수준과 단계별 어노테이션 스키마
- 실행된 어노테이션 작업
- 내보낸 구조화된 평가 결과
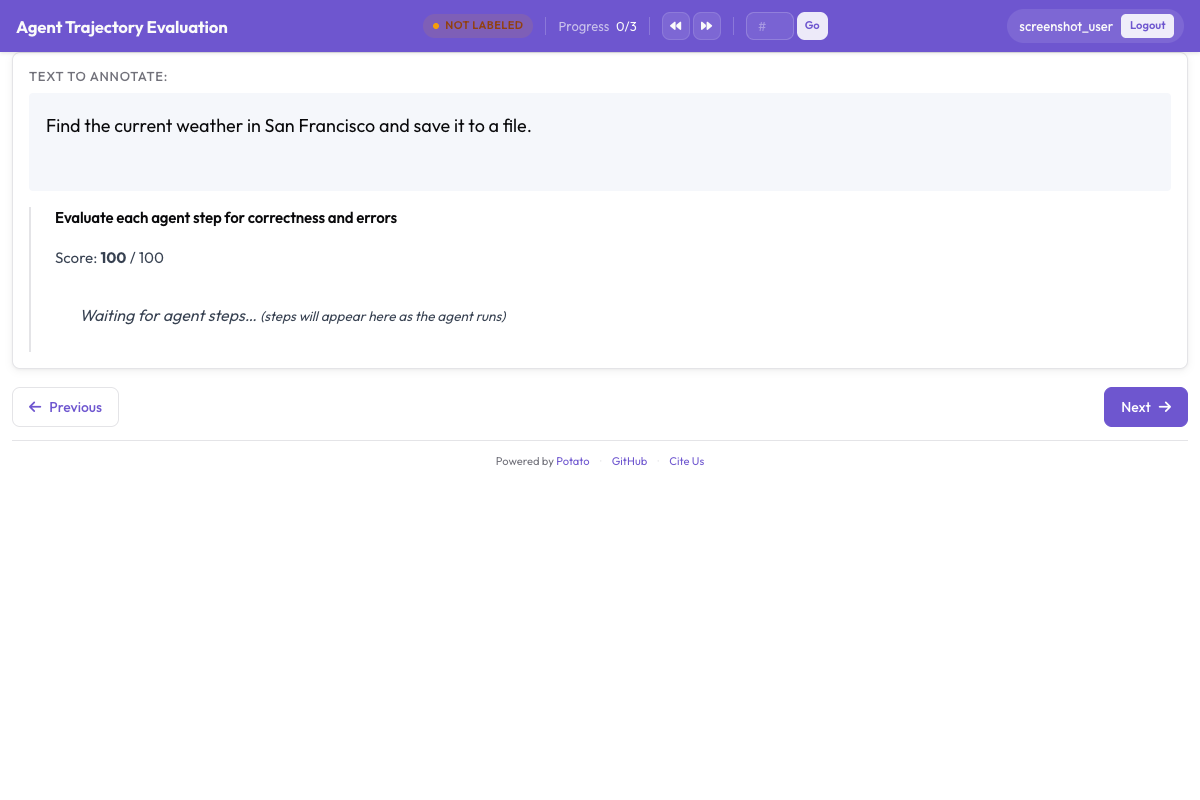
Potato의 에이전트 트레이스 표시는 각 단계를 생각, 행동, 관찰에 대해 색상으로 구분된 카드로 렌더링합니다.
사전 준비
Potato 2.3.0 이상을 설치합니다.
pip install --upgrade potato-annotation평가할 에이전트 트레이스도 필요합니다. 이 가이드는 ReAct 트레이스를 사용하지만, 동일한 접근 방식이 지원되는 12개 형식 어디에든 적용됩니다.
1단계: 에이전트 트레이스 준비
ReAct 트레이스는 Thought, Action, Observation 단계의 시퀀스입니다. 다음은 최소한의 예시입니다. data/traces.jsonl 파일을 만듭니다.
{
  "trace_id": "trace_001",
  "task": "What is the capital of Australia and what is its population?",
  "trace": [
    {"type": "thought", "content": "I need to find the capital of Australia and its population. Let me search for this."},
    {"type": "action", "content": "search", "action_input": "capital of Australia"},
    {"type": "observation", "content": "Canberra is the capital city of Australia. It was chosen as the capital in 1908 as a compromise between Sydney and Melbourne."},
    {"type": "thought", "content": "The capital is Canberra. Now I need to find its population."},
    {"type": "action", "content": "search", "action_input": "Canberra population 2025"},
    {"type": "observation", "content": "Canberra has a population of approximately 467,000 as of 2025, making it the eighth-largest city in Australia."},
    {"type": "thought", "content": "I now have both pieces of information. The capital of Australia is Canberra with a population of approximately 467,000."},
    {"type": "action", "content": "finish", "action_input": "The capital of Australia is Canberra, with a population of approximately 467,000 as of 2025."}
  ],
  "ground_truth": "Canberra, approximately 467,000"
}
JSONL 파일의 각 줄은 하나의 완전한 에이전트 트레이스입니다. trace 필드는 단계별 로그를 담고 있습니다. task 필드는 에이전트가 수행하도록 요청받은 작업입니다.
트레이스 형식에 관한 참고 사항
OpenAI function-calling 트레이스의 경우 형식이 다릅니다.
{
  "trace_id": "oai_001",
  "task": "Find cheap flights from NYC to London",
  "messages": [
    {"role": "user", "content": "Find cheap flights from NYC to London"},
    {"role": "assistant", "content": null, "tool_calls": [{"function": {"name": "search_flights", "arguments": "{\"from\": \"NYC\", \"to\": \"LHR\"}"}}]},
    {"role": "tool", "name": "search_flights", "content": "{\"flights\": [{\"airline\": \"BA\", \"price\": 450}, {\"airline\": \"AA\", \"price\": 520}]}"},
    {"role": "assistant", "content": "I found flights from NYC to London. The cheapest is British Airways at $450."}
  ]
}
Potato의 변환기가 이러한 차이를 처리합니다. 올바른 변환기 이름만 지정하면 됩니다.
2단계: 프로젝트 구성 만들기
config.yaml을 만듭니다.
annotation_task_name: "ReAct Agent Evaluation"
task_dir: "."

data_files:
  - "data/traces.jsonl"

item_properties:
  id_key: trace_id
  text_key: task

# --- Agentic annotation settings ---
agentic:
  enabled: true
  trace_converter: react
  display_type: agent_trace

  agent_trace_display:
    colors:
      thought: "#6E56CF"
      action: "#3b82f6"
      observation: "#22c55e"
      error: "#ef4444"
    collapse_observations: true
    collapse_threshold: 400
    show_step_numbers: true
    show_timestamps: false
    render_json: true
    syntax_highlight: true
이는 Potato에게 다음을 지시합니다.
data/traces.jsonl에서 트레이스를 로드합니다- ReAct 변환기를 사용해
trace필드를 파싱합니다 - 색상으로 구분된 단계 카드가 있는 에이전트 트레이스 표시를 사용해 트레이스를 표시합니다
3단계: 어노테이션 스키마 설계
에이전트 평가에는 보통 트레이스 수준 판단(에이전트가 성공했는가?)과 단계 수준 판단(각 단계가 올바랐는가?)이 모두 필요합니다. 두 가지를 모두 추가해 봅시다.
config.yaml에 다음을 추가합니다.
annotation_schemes:
  # --- Trace-level schemas ---

  # 1. Task success (the most important metric)
  - annotation_type: radio
    name: task_success
    description: "Did the agent successfully complete the task?"
    labels:
      - "Success"
      - "Partial Success"
      - "Failure"
    label_requirement:
      required: true
    sequential_key_binding: true

  # 2. Answer correctness (if the task has a ground truth)
  - annotation_type: radio
    name: answer_correctness
    description: "Is the agent's final answer factually correct?"
    labels:
      - "Correct"
      - "Partially Correct"
      - "Incorrect"
      - "Cannot Determine"
    label_requirement:
      required: true

  # 3. Efficiency rating
  - annotation_type: likert
    name: efficiency
    description: "Did the agent use an efficient path to the answer?"
    min: 1
    max: 5
    labels:
      1: "Very Inefficient (many unnecessary steps)"
      3: "Average"
      5: "Optimal (no wasted steps)"

  # 4. Free-text notes
  - annotation_type: text
    name: evaluator_notes
    description: "Any additional observations"
    label_requirement:
      required: false

  # --- Step-level schemas ---

  # 5. Per-step correctness
  - annotation_type: per_turn_rating
    name: step_correctness
    target: agentic_steps
    description: "Was this step correct and useful?"
    rating_type: radio
    labels:
      - "Correct"
      - "Partially Correct"
      - "Incorrect"
      - "Unnecessary"

  # 6. Per-step error type (only shown when step is not correct)
  - annotation_type: per_turn_rating
    name: error_type
    target: agentic_steps
    description: "What type of error occurred?"
    rating_type: multiselect
    labels:
      - "Wrong tool/action"
      - "Wrong arguments"
      - "Hallucinated information"
      - "Reasoning error"
      - "Redundant step"
      - "Premature termination"
      - "Other"
    conditional:
      show_when:
        step_correctness: ["Partially Correct", "Incorrect", "Unnecessary"]
이로써 분석의 양쪽 끝을 모두 다룹니다. 성공/실패 레이블과 답변 정확성 평가는 상위 수준의 수치를 제공합니다. 효율성 점수로는 전략을 비교할 수 있습니다. 그리고 단계가 잘못으로 표시될 때만 나타나는 오류 분류 체계가 포함된 단계별 평가는 어디에서 문제가 생겼는지 정확히 알려줍니다.
4단계: 출력 구성 및 서버 시작
config.yaml에 출력 설정을 추가합니다.
output_annotation_dir: "output/"
export_annotation_format: "jsonl"

# Optional: also export to Parquet for analysis
parquet_export:
  enabled: true
  output_dir: "output/parquet/"
  compression: zstd
참고용 전체 config.yaml입니다.
annotation_task_name: "ReAct Agent Evaluation"
task_dir: "."

data_files:
  - "data/traces.jsonl"

item_properties:
  id_key: trace_id
  text_key: task

agentic:
  enabled: true
  trace_converter: react
  display_type: agent_trace
  agent_trace_display:
    colors:
      thought: "#6E56CF"
      action: "#3b82f6"
      observation: "#22c55e"
      error: "#ef4444"
    collapse_observations: true
    collapse_threshold: 400
    show_step_numbers: true
    render_json: true
    syntax_highlight: true

annotation_schemes:
  - annotation_type: radio
    name: task_success
    description: "Did the agent successfully complete the task?"
    labels: ["Success", "Partial Success", "Failure"]
    label_requirement:
      required: true
    sequential_key_binding: true

  - annotation_type: radio
    name: answer_correctness
    description: "Is the agent's final answer factually correct?"
    labels: ["Correct", "Partially Correct", "Incorrect", "Cannot Determine"]
    label_requirement:
      required: true

  - annotation_type: likert
    name: efficiency
    description: "Did the agent use an efficient path?"
    min: 1
    max: 5
    labels:
      1: "Very Inefficient"
      3: "Average"
      5: "Optimal"

  - annotation_type: text
    name: evaluator_notes
    description: "Any additional observations"
    label_requirement:
      required: false

  - annotation_type: per_turn_rating
    name: step_correctness
    target: agentic_steps
    description: "Was this step correct?"
    rating_type: radio
    labels: ["Correct", "Partially Correct", "Incorrect", "Unnecessary"]

  - annotation_type: per_turn_rating
    name: error_type
    target: agentic_steps
    description: "Error type"
    rating_type: multiselect
    labels:
      - "Wrong tool/action"
      - "Wrong arguments"
      - "Hallucinated information"
      - "Reasoning error"
      - "Redundant step"
      - "Premature termination"
      - "Other"
    conditional:
      show_when:
        step_correctness: ["Partially Correct", "Incorrect", "Unnecessary"]

output_annotation_dir: "output/"
export_annotation_format: "jsonl"

parquet_export:
  enabled: true
  output_dir: "output/parquet/"
  compression: zstd
서버를 시작합니다.
potato start config.yaml -p 8000브라우저에서 http://localhost:8000을 엽니다.
5단계: 어노테이션 워크플로
어노테이터가 트레이스를 열면 다음이 보입니다.
- 상단의 작업 설명 (원래 사용자 쿼리)
- 전체 에이전트 트레이스를 유형별로 색상 구분해 보여주는 단계 카드:
- 생각/추론에 대한 보라색 카드
- 행동/도구 호출에 대한 파란색 카드
- 관찰/결과에 대한 초록색 카드
- 오류에 대한 빨간색 카드
- 각 단계 카드 옆의 단계별 평가 컨트롤
- 트레이스 표시 아래의 트레이스 수준 스키마
일반적인 워크플로는 다음과 같습니다.
- 작업 설명을 읽어 에이전트가 무엇을 해야 했는지 파악합니다
- 트레이스 단계를 하나씩 살펴보며 각각을 평가합니다
- "Partially Correct" 또는 "Incorrect"로 평가된 단계가 있으면 오류 유형을 선택합니다
- 전체 트레이스를 평가합니다(성공, 정확성, 효율성)
- 필요하면 메모를 추가합니다
- 제출하고 다음 트레이스로 이동합니다
어노테이터를 위한 팁
접힌 관찰을 한눈에 믿고 넘기지 말고 펼쳐 보세요. 에이전트가 찾은 내용을 잘못 읽은 지점을 바로 거기서 잡아냅니다. 작업 성공을 평가하기 전에, 있다면 최종 답변을 ground truth와 대조해 보세요. "Unnecessary"와 "Incorrect"는 구분하세요. 낭비된 단계는 수고를 들게 하지만 실제로 오류를 일으키지는 않기 때문입니다. 그리고 긴 트레이스에서는 단계 타임라인 사이드바를 이용하면 관심 있는 단계로 바로 건너뛸 수 있습니다.
6단계: 결과 분석
어노테이션이 끝나면 결과를 프로그램으로 분석합니다.
pandas를 사용한 기본 분석
import pandas as pd
import json

# Load annotations
annotations = []
with open("output/annotations.jsonl") as f:
    for line in f:
        annotations.append(json.loads(line))

df = pd.DataFrame(annotations)

# Task success rate
success_counts = df.groupby("annotations").apply(
    lambda x: x.iloc[0]["annotations"]["task_success"]
).value_counts()
print("Task Success Distribution:")
print(success_counts)

# Average efficiency rating
efficiency_scores = [
    a["annotations"]["efficiency"]
    for a in annotations
    if "efficiency" in a["annotations"]
]
print(f"\nAverage Efficiency: {sum(efficiency_scores) / len(efficiency_scores):.2f}")
단계 수준 오류 분석
# Collect all step-level errors
error_counts = {}
for ann in annotations:
    step_errors = ann["annotations"].get("error_type", {})
    for step_idx, errors in step_errors.items():
        for error in errors:
            error_counts[error] = error_counts.get(error, 0) + 1

print("Error Type Distribution:")
for error, count in sorted(error_counts.items(), key=lambda x: -x[1]):
    print(f"  {error}: {count}")
DuckDB를 사용한 분석 (Parquet 경유)
import duckdb

# Overall success rate
result = duckdb.sql("""
    SELECT value, COUNT(*) as count
    FROM 'output/parquet/annotations.parquet'
    WHERE schema_name = 'task_success'
    GROUP BY value
    ORDER BY count DESC
""")
print(result)
7단계: 규모 확장
대규모 평가 프로젝트(수백 또는 수천 개의 트레이스)에서는 다음 구성을 고려하세요.
다중 어노테이터
어노테이터 간 일치도를 위해 트레이스마다 여러 어노테이터를 배정합니다.
annotation_task_config:
  total_annotations_per_instance: 3
  assignment_strategy: random
사전 구축된 스키마 사용
빠르게 설정하려면 Potato의 사전 구축된 에이전트 평가 스키마를 사용하세요.
annotation_schemes:
  - preset: agent_task_success
  - preset: agent_step_correctness
  - preset: agent_error_taxonomy
  - preset: agent_efficiency
품질 관리
품질 모니터링을 위해 골드 스탠더드 인스턴스를 활성화합니다.
phases:
  training:
    enabled: true
    data_file: "data/training_traces.jsonl"
    passing_criteria:
      min_correct: 4
      total_questions: 5
다른 에이전트 유형에 맞게 조정하기
OpenAI Function Calling
agentic:
  enabled: true
  trace_converter: openai
  display_type: agent_trace
Anthropic Tool Use
agentic:
  enabled: true
  trace_converter: anthropic
  display_type: agent_trace
다중 에이전트 시스템 (CrewAI/AutoGen)
agentic:
enabled: true
trace_converter: multi_agent
display_type: agent_trace
multi_agent:
agent_converters:
researcher: react
writer: anthropic
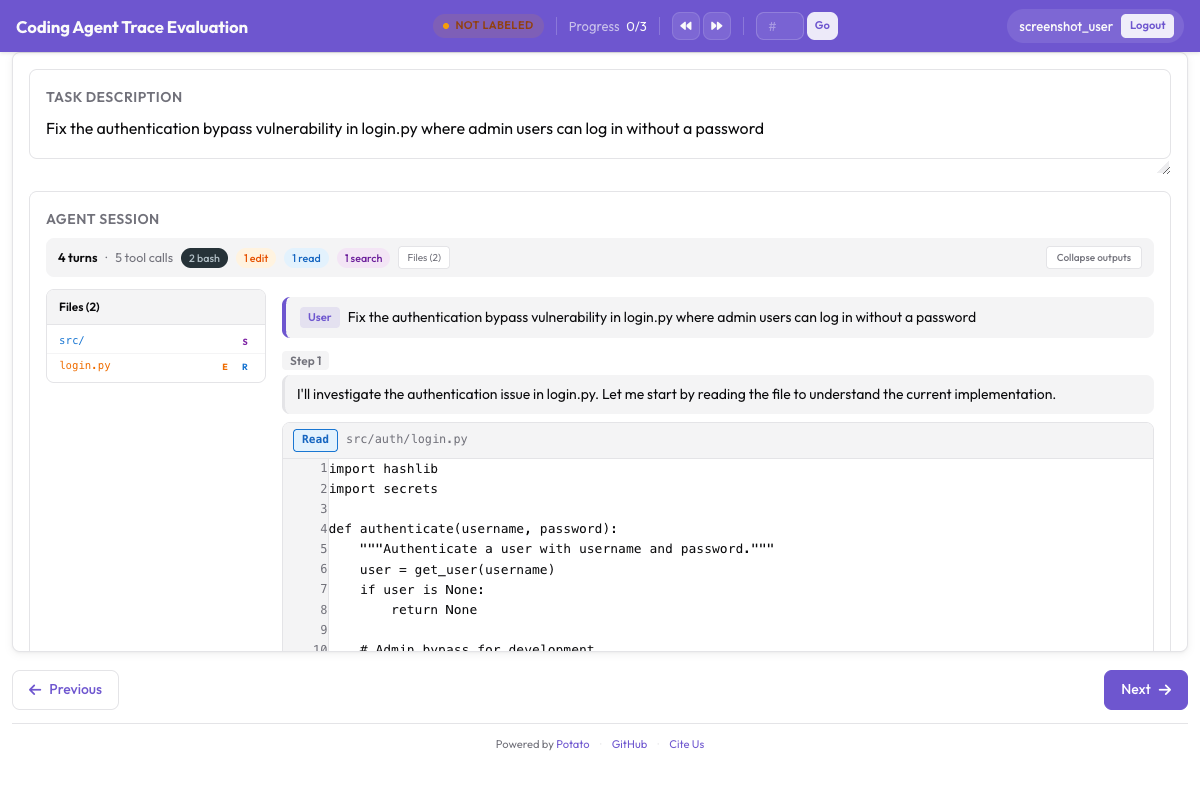
reviewer: openai코딩 에이전트의 경우 Potato는 코드 diff와 터미널 출력을 적절한 형식으로 렌더링합니다.
웹 브라우징 에이전트
웹 에이전트의 경우 웹 에이전트 표시로 전환합니다.
agentic:
  enabled: true
  trace_converter: webarena
  display_type: web_agent
  web_agent_display:
    screenshot_max_width: 900
    overlay:
      enabled: true
    filmstrip:
      enabled: true
전용 가이드는 웹 브라우징 에이전트 어노테이션을 참고하세요.
요약
에이전트를 손으로 평가하려면 알맞은 도구가 필요한데, Potato의 에이전틱 어노테이션 시스템이 바로 그 일을 위해 만들어졌습니다. 12개의 트레이스 변환기를 제공하므로 대부분의 프레임워크에서 트레이스를 재구성 없이 가져올 수 있고, 도구 사용, 웹 브라우징, 대화형 에이전트에 맞춘 세 가지 표시 유형, 단계 수준 판단을 위한 턴별 평가, 일반적인 평가 차원을 위한 9개의 사전 구축 스키마, 그리고 결과를 본격적으로 분석할 때를 위한 Parquet 내보내기를 갖추고 있습니다.
기억할 점은 이것입니다. "에이전트가 올바른 답을 냈는가?"는 쉬운 질문입니다. 더 어려운 질문은 매 단계에서 올바르게 추론했는가이며, 그 답을 주는 것이 단계별 어노테이션입니다. 집계 지표는 그런 실수들을 조용히 평균으로 흐려 버립니다.
구현 세부 사항은 에이전트 평가 가이드와 에이전트 트레이스 문서를 참고하세요.
더 읽을거리
- 에이전틱 어노테이션 문서
- 웹 브라우징 에이전트 어노테이션
- 솔로 모드 -- 에이전틱 어노테이션을 인간-LLM 협력 평가와 결합
- Best-Worst Scaling -- 에이전트 출력을 비교 방식으로 순위 매기기
- Parquet 내보내기 -- 분석을 위한 효율적인 내보내기