Bounding Boxes für die Objekterkennung zeichnen
So richtest du in Potato Bounding-Box-Annotation für Computer Vision ein: Labelfarben, minimale Boxgröße, mehrere Klassen, Prüfregeln und Export nach COCO/YOLO.
Wer einen Objektdetektor trainiert, braucht Bounding Boxes. Dieses Tutorial beginnt mit einer minimalen Einrichtung und arbeitet sich zu Attributen, Prüfregeln und einer vollständigen Produktivkonfiguration vor. Die Bild-Optionen dahinter stehen in der Dokumentation zur Bildannotation.
Bounding Boxes einrichten
Minimale Konfiguration
annotation_task_name: "Object Detection Annotation"

data_files:
  - "data/images.json"

annotation_schemes:
  - annotation_type: image_annotation
    name: objects
    description: "Draw boxes around all objects"
    tools:
      - bbox
    labels:
      - name: car
        color: "#FF6B6B"
      - name: person
        color: "#4ECDC4"
      - name: bicycle
        color: "#45B7D1"
Wie es abläuft
- Ein Label in der Werkzeugleiste auswählen
- Mit gedrückter Maustaste eine Box aufziehen
- Die Ecken nachjustieren
- Weitere Boxen ergänzen, soweit nötig
- Abschicken
Annotierende zeichnen die Boxen direkt auf dem Bild, per Klicken und Ziehen:
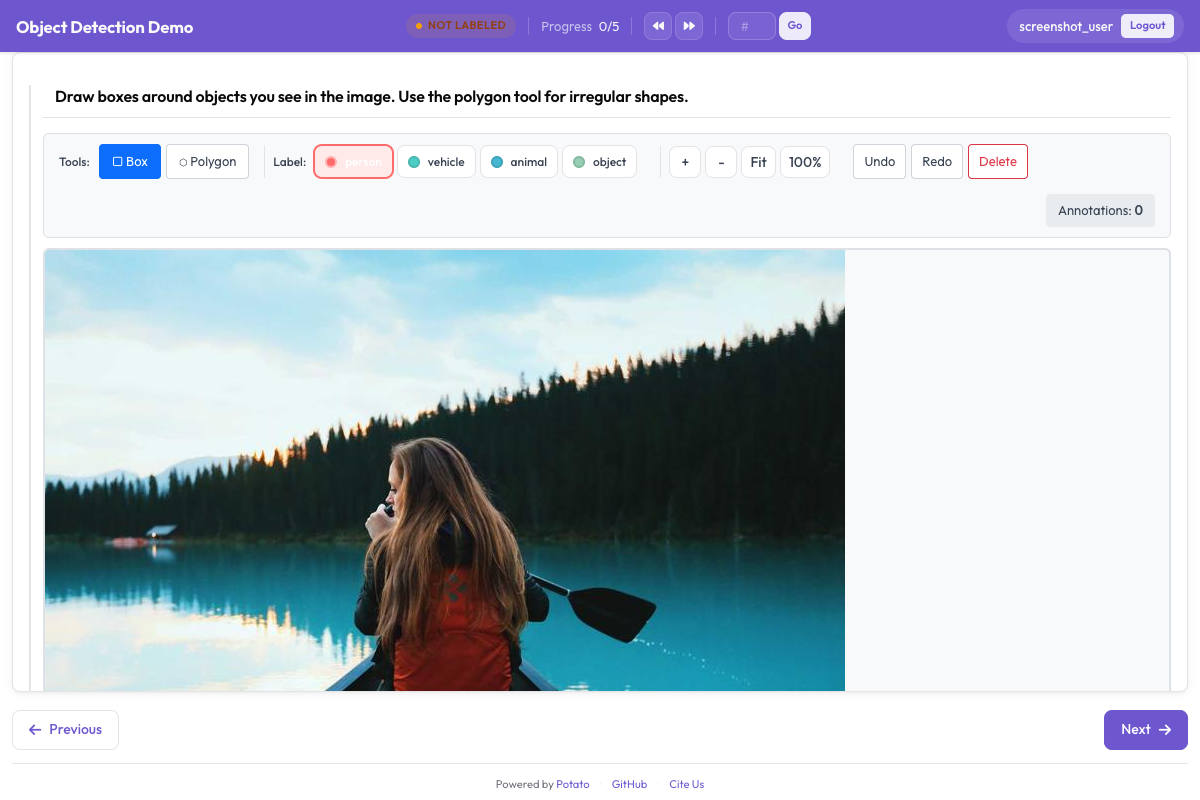 Mit dem Bounding-Box-Werkzeug zeichnen und labeln Annotierende rechteckige Bereiche auf Bildern
Labels genauer konfigurieren
annotation_schemes:
  - annotation_type: image_annotation
    name: objects
    description: "Annotate all visible objects"
    tools:
      - bbox
    labels:
      - name: person
        color: "#FF6B6B"
        description: "Any human, partial or full"
        keyboard_shortcut: "p"

      - name: car
        color: "#4ECDC4"
        description: "Cars, trucks, SUVs"
        keyboard_shortcut: "c"

      - name: motorcycle
        color: "#45B7D1"
        description: "Motorcycles and scooters"
        keyboard_shortcut: "m"

      - name: bicycle
        color: "#96CEB4"
        description: "Bicycles of all types"
        keyboard_shortcut: "b"

      - name: traffic_light
        color: "#FFEAA7"
        description: "Traffic signals"
        keyboard_shortcut: "t"

      - name: stop_sign
        color: "#DDA0DD"
        description: "Stop signs"
        keyboard_shortcut: "s"
Attribute für Objekte ergänzen
Zusätzliche Angaben zu jeder Box erfassen:
annotation_schemes:
  - annotation_type: image_annotation
    name: objects
    tools:
      - bbox
    labels:
      - name: person
        color: "#FF6B6B"
        attributes:
          - name: occlusion
            type: radio
            options: [none, partial, heavy]
          - name: truncated
            type: checkbox
            description: "Object extends beyond image"
          - name: difficult
            type: checkbox
            description: "Hard to identify"
Sobald jemand eine Box zeichnet, wird nach diesen Attributen gefragt.
Prüfregeln
Annotationsqualität über Prüfregeln absichern:
annotation_schemes:
  - annotation_type: image_annotation
    name: objects
    tools:
      - bbox
    labels: [...]
    min_annotations: 1
Tastenkürzel
Potato bringt Tastenkürzel für zügiges Annotieren mit:
- Zifferntasten wählen Labels aus
- Entf löscht ausgewählte Annotationen
- Pfeiltasten wechseln zwischen Elementen
Anzeigeoptionen
Einstellungen für die Bilddarstellung:
image_display:
  width: 800
  height: 600
Vollständige Produktivkonfiguration
annotation_task_name: "Autonomous Driving - Object Detection"

data_files:
  - "data/driving_frames.json"

annotation_schemes:
  - annotation_type: image_annotation
    name: objects
    description: "Annotate all traffic participants and objects"
    tools:
      - bbox
    min_annotations: 1
    labels:
      - name: vehicle
        color: "#FF6B6B"
        keyboard_shortcut: "v"
        attributes:
          - name: type
            type: radio
            options: [car, truck, bus, motorcycle, bicycle]
          - name: occlusion
            type: radio
            options: [0%, 1-25%, 26-50%, 51-75%, 76-99%]

      - name: pedestrian
        color: "#4ECDC4"
        keyboard_shortcut: "p"
        attributes:
          - name: pose
            type: radio
            options: [standing, walking, sitting, lying]
          - name: age_group
            type: radio
            options: [child, adult, elderly]

      - name: cyclist
        color: "#45B7D1"
        keyboard_shortcut: "c"

      - name: traffic_sign
        color: "#FFEAA7"
        keyboard_shortcut: "t"
        attributes:
          - name: sign_type
            type: radio
            options: [stop, yield, speed_limit, warning, other]

      - name: traffic_light
        color: "#DDA0DD"
        keyboard_shortcut: "l"
        attributes:
          - name: state
            type: radio
            options: [red, yellow, green, off, unknown]
Ausgabeformat
{
  "frame_id": "frame_0001",
  "frame_path": "/images/frame_0001.jpg",
  "image_dimensions": {"width": 1920, "height": 1080},
  "annotations": {
    "objects": [
      {
        "label": "vehicle",
        "bbox": [450, 380, 680, 520],
        "attributes": {
          "type": "car",
          "occlusion": "0%"
        }
      },
      {
        "label": "pedestrian",
        "bbox": [820, 400, 870, 550],
        "attributes": {
          "pose": "walking",
          "age_group": "adult"
        }
      }
    ]
  }
}
Hinweise für saubere Bounding Boxes
Zieh die Boxen eng um das Objekt, damit das Modell nicht massenhaft Hintergrund zu sehen bekommt. Halte fest, wie mit den unangenehmen Fällen umzugehen ist (Verdeckung, am Bildrand abgeschnittene Objekte), und geht früh gemeinsam einen Stapel Beispiele durch, damit alle gleich zeichnen. Behalte die Anzahl der Boxen und die Größenverteilung im Blick; ein plötzlicher Ausschlag heißt meistens, dass jemand die Regeln anders auslegt.
Nächste Schritte
- Ergänze Polygon-Annotation für genaue Segmentierung
- Lies zur Keypoint-Erkennung für Pose Estimation
- Richte Qualitätskontrolle für verlässliche Annotationen ein
Vollständige Dokumentation unter Bildannotation.