ऑब्जेक्ट डिटेक्शन के लिए bounding box बनाना
Potato में computer vision के लिए bounding box एनोटेशन सेट कीजिए, और लेबल के रंग, बॉक्स का न्यूनतम आकार, कई श्रेणियों का समर्थन, जाँच के नियम तथा COCO/YOLO निर्यात कॉन्फ़िगर कीजिए।
अगर आप कोई object detector प्रशिक्षित कर रहे हैं, तो आपको bounding box चाहिए। यह ट्यूटोरियल सबसे छोटे सेटअप से शुरू होकर एट्रिब्यूट, जाँच के नियमों और एक पूरे प्रोडक्शन कॉन्फ़िग तक जाता है। इसके पीछे के इमेज विकल्पों के लिए इमेज एनोटेशन दस्तावेज़ देखें।
बुनियादी bounding box सेटअप
सबसे छोटा कॉन्फ़िगरेशन
annotation_task_name: "Object Detection Annotation"

data_files:
  - "data/images.json"

annotation_schemes:
  - annotation_type: image_annotation
    name: objects
    description: "Draw boxes around all objects"
    tools:
      - bbox
    labels:
      - name: car
        color: "#FF6B6B"
      - name: person
        color: "#4ECDC4"
      - name: bicycle
        color: "#45B7D1"
यह चलता कैसे है
- टूलबार से एक लेबल चुनिए
- क्लिक करके खींचिए और बॉक्स बनाइए
- बॉक्स ठीक करने के लिए कोने खिसकाइए
- ज़रूरत के हिसाब से और बॉक्स जोड़िए
- काम पूरा होने पर सबमिट कीजिए
एनोटेटर क्लिक-और-खींचने वाले इंटरफ़ेस से सीधे इमेज पर bounding box बनाते हैं:
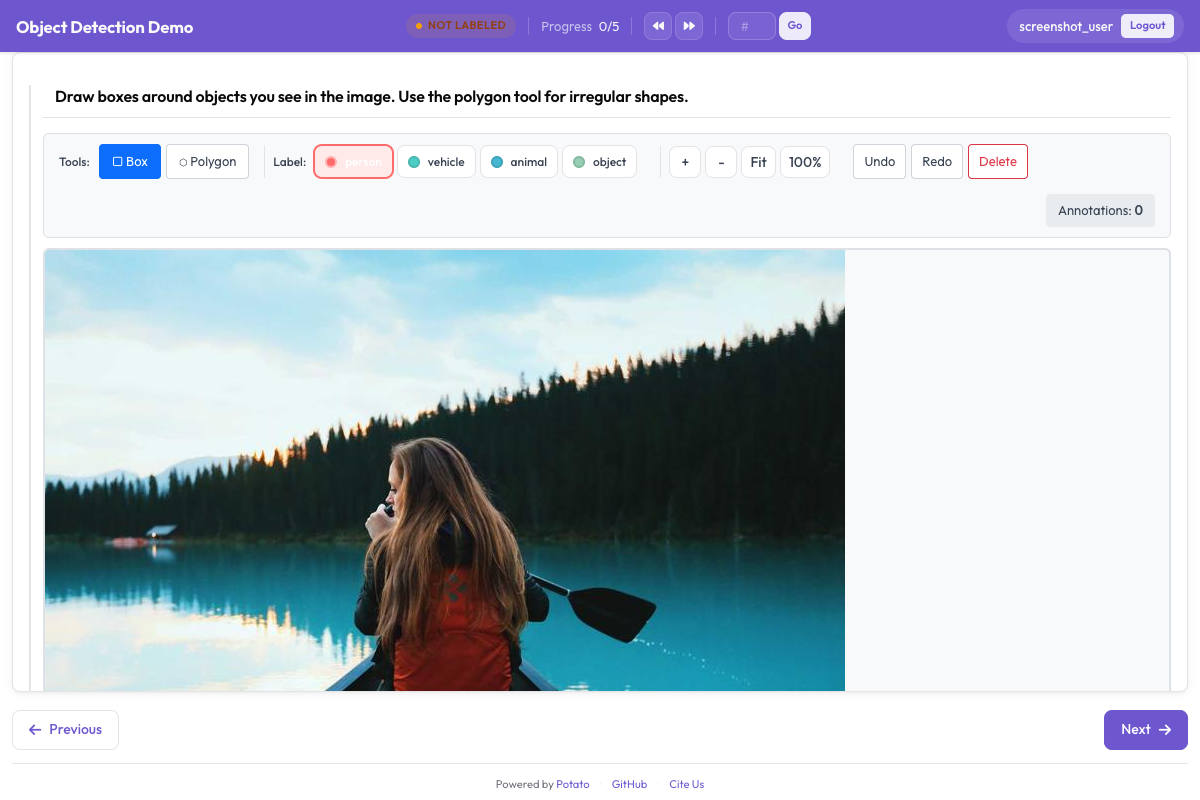 bounding box टूल से एनोटेटर इमेज पर आयताकार हिस्से बनाकर उन्हें लेबल कर सकते हैं
विस्तार से लेबल कॉन्फ़िगरेशन
annotation_schemes:
  - annotation_type: image_annotation
    name: objects
    description: "Annotate all visible objects"
    tools:
      - bbox
    labels:
      - name: person
        color: "#FF6B6B"
        description: "Any human, partial or full"
        keyboard_shortcut: "p"

      - name: car
        color: "#4ECDC4"
        description: "Cars, trucks, SUVs"
        keyboard_shortcut: "c"

      - name: motorcycle
        color: "#45B7D1"
        description: "Motorcycles and scooters"
        keyboard_shortcut: "m"

      - name: bicycle
        color: "#96CEB4"
        description: "Bicycles of all types"
        keyboard_shortcut: "b"

      - name: traffic_light
        color: "#FFEAA7"
        description: "Traffic signals"
        keyboard_shortcut: "t"

      - name: stop_sign
        color: "#DDA0DD"
        description: "Stop signs"
        keyboard_shortcut: "s"
ऑब्जेक्ट के एट्रिब्यूट जोड़ना
हर बॉक्स के बारे में अतिरिक्त जानकारी दर्ज कीजिए:
annotation_schemes:
  - annotation_type: image_annotation
    name: objects
    tools:
      - bbox
    labels:
      - name: person
        color: "#FF6B6B"
        attributes:
          - name: occlusion
            type: radio
            options: [none, partial, heavy]
          - name: truncated
            type: checkbox
            description: "Object extends beyond image"
          - name: difficult
            type: checkbox
            description: "Hard to identify"
एनोटेटर जब कोई बॉक्स बनाएगा, तब उससे ये एट्रिब्यूट भरने को कहा जाएगा।
जाँच के नियम
जाँच लगाकर एनोटेशन की गुणवत्ता बनाए रखिए:
annotation_schemes:
  - annotation_type: image_annotation
    name: objects
    tools:
      - bbox
    labels: [...]
    min_annotations: 1
कीबोर्ड शॉर्टकट
तेज़ी से एनोटेट करने के लिए Potato में कीबोर्ड शॉर्टकट पहले से मौजूद हैं:
- अंक वाली कुंजियाँ लेबल चुनती हैं
- Delete चुने हुए एनोटेशन हटाती है
- तीर वाली कुंजियाँ आइटम के बीच ले जाती हैं
दिखाने के विकल्प
इमेज दिखाने की सेटिंग कॉन्फ़िगर कीजिए:
image_display:
  width: 800
  height: 600
पूरा प्रोडक्शन कॉन्फ़िगरेशन
annotation_task_name: "Autonomous Driving - Object Detection"

data_files:
  - "data/driving_frames.json"

annotation_schemes:
  - annotation_type: image_annotation
    name: objects
    description: "Annotate all traffic participants and objects"
    tools:
      - bbox
    min_annotations: 1
    labels:
      - name: vehicle
        color: "#FF6B6B"
        keyboard_shortcut: "v"
        attributes:
          - name: type
            type: radio
            options: [car, truck, bus, motorcycle, bicycle]
          - name: occlusion
            type: radio
            options: [0%, 1-25%, 26-50%, 51-75%, 76-99%]

      - name: pedestrian
        color: "#4ECDC4"
        keyboard_shortcut: "p"
        attributes:
          - name: pose
            type: radio
            options: [standing, walking, sitting, lying]
          - name: age_group
            type: radio
            options: [child, adult, elderly]

      - name: cyclist
        color: "#45B7D1"
        keyboard_shortcut: "c"

      - name: traffic_sign
        color: "#FFEAA7"
        keyboard_shortcut: "t"
        attributes:
          - name: sign_type
            type: radio
            options: [stop, yield, speed_limit, warning, other]

      - name: traffic_light
        color: "#DDA0DD"
        keyboard_shortcut: "l"
        attributes:
          - name: state
            type: radio
            options: [red, yellow, green, off, unknown]
आउटपुट प्रारूप
{
  "frame_id": "frame_0001",
  "frame_path": "/images/frame_0001.jpg",
  "image_dimensions": {"width": 1920, "height": 1080},
  "annotations": {
    "objects": [
      {
        "label": "vehicle",
        "bbox": [450, 380, 680, 520],
        "attributes": {
          "type": "car",
          "occlusion": "0%"
        }
      },
      {
        "label": "pedestrian",
        "bbox": [820, 400, 870, 550],
        "attributes": {
          "pose": "walking",
          "age_group": "adult"
        }
      }
    ]
  }
}
अच्छे bounding box के लिए सुझाव
बॉक्स ऑब्जेक्ट से चिपके हुए बनाइए, वरना मॉडल को ढेर सारी पृष्ठभूमि खिलानी पड़ेगी। मुश्किल मामलों (occlusion, किनारे पर कटे हुए ऑब्जेक्ट) से कैसे निपटना है यह लिखकर रखिए, और शुरू में ही कुछ उदाहरणों को साथ बैठकर देख लीजिए ताकि सब उन्हें एक जैसा बनाएँ। बॉक्स की संख्या और आकार के बँटवारे पर नज़र रखिए; अचानक कोई बदलाव आमतौर पर इसका संकेत होता है कि कोई नियमों को अलग तरह से समझ रहा है।
अगले क़दम
- सटीक segmentation के लिए polygon एनोटेशन जोड़िए
- pose estimation के लिए keypoint detection के बारे में पढ़िए
- भरोसेमंद एनोटेशन के लिए गुणवत्ता नियंत्रण सेट कीजिए
पूरे दस्तावेज़ छवि एनोटेशन पर हैं।