Getting Started with Potato in 5 Minutes
Set up your first Potato annotation project in 5 minutes, from pip install to a running server with a YAML config, sample data, and your first labeled instances.
This tutorial gets you from nothing to a running annotation task in about five minutes. We'll build a small sentiment analysis task, which is enough to see how the pieces fit together.
Step 1: Install Potato
Install it with pip:
pip install potato-annotationVerify the installation:
potato --versionStep 2: Create Your Configuration
Create a file called config.yaml with this minimal configuration:
annotation_task_name: "Quick Start Sentiment Analysis"

# Your data file
data_files:
  - data.json

# Annotation interface
annotation_schemes:
  - annotation_type: radio
    name: sentiment
    description: "What is the sentiment of this text?"
    labels:
      - Positive
      - Negative
      - Neutral
Step 3: Create Sample Data
Create a data.json file with some sample texts:
{"id": "1", "text": "I love this product! It's amazing!"}
{"id": "2", "text": "Terrible experience. Would not recommend."}
{"id": "3", "text": "The weather is partly cloudy today."}
{"id": "4", "text": "Best purchase I've ever made!"}
{"id": "5", "text": "This is the worst service I've encountered."}
Step 4: Start Annotating
Launch the annotation server:
potato start config.yamlThen open http://localhost:8000 in your browser and you'll see the annotation interface:
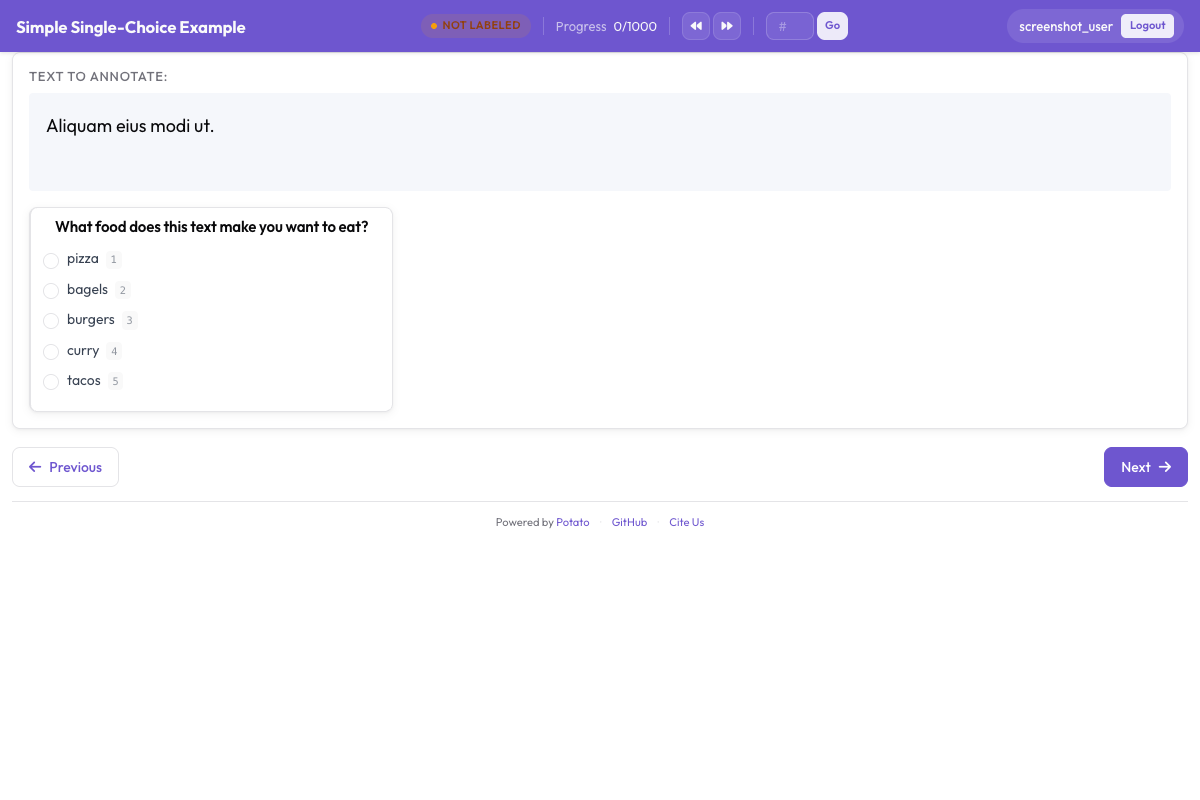
Step 5: Label Your Data
- Log in with any username (Potato creates accounts automatically)
- Read the text displayed
- Select the appropriate sentiment label
- Click "Submit" to save and move to the next item
Step 6: Export Your Annotations
Your annotations are automatically saved to the annotation_output/ folder. Each annotator's work is saved in a separate file.
To view your annotations:
cat annotation_output/your_username.jsonlWhere to go next
That's a working annotation task. From here you can add keyboard shortcuts so labeling goes faster, dress up the interface with instructions, tooltips, and validation, bring in multiple annotators with user management and quality control, or try the other annotation types: spans, checkboxes, Likert scales, and the rest. The documentation covers each of these in depth, and the showcase has full configs you can copy from. For a more detailed walkthrough of this setup, see the quick start guide.